
Excire Search: A Groundbreaking Search and Auto Keyword Tool for Lightroom – Hands-On Review

For the past 15 years or so I’ve been helping people organize, backup and print their photographs. And the one thing that has been a challenge for almost everyone (including me!) is keywording. It’s just not a lot of fun (for most people) to go through thousands (or hundreds of thousands) of images and videos and assign appropriate keywords to them. But keywording images and videos can pay huge dividends in the long run because having a collection with good keywords means that you can more easily find images for personal projects, client work and stock photography licensing.
Face recognition inside of Lightroom and other programs has helped quite a bit, but it’s far from perfect. And of course, not every photo has a recognizable person in it, so we have been faced with a problem in need of a solution. Until now.
The solution I’m referring to is a Lightroom Classic CC plug-in called Excire Search. And it does more than just automatically create keywords.
What it Does
Excire Search works via a Lightroom plug-in to “initialize” or look through your image collection one image at a time so that it can then use the image information to both create keywords and allow for creative searches by keyword or even via a sample image uploaded from your computer. It can initialize 10,000-20,000 images per hour (according to the software’s developer), but it depends on your system and whether you have already created Smart Previews. I didn’t time the process exactly, but Excire Search Pro initialized just over 400,000 images in my catalog on a MacBook Pro over a period of 4-6 days (I stopped the process a few times to take my computer with me, and I had very few Smart Previews in my catalog before starting the process). While it was initializing, I was still able to work on my computer and inside Lightroom. You can run a new initialization at any time, and it will quickly recognize which photos have already been initialized.
In case you’d like a quick look at how good the automatic keywording can be, I was very impressed by what the software came up with for one of my photos that included hot air balloons (click on the image to see the keywords much larger):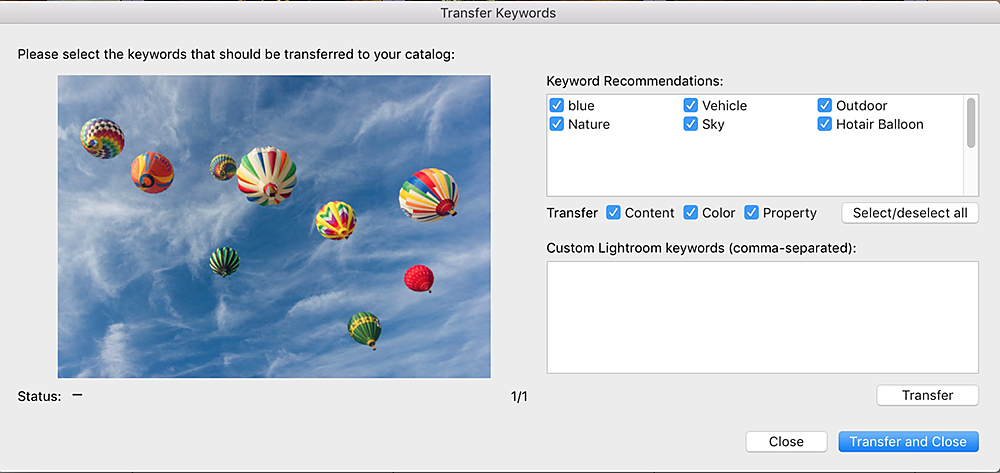
Getting Started
Installing the Excire Search Plug-in, setting preferences and starting the initialization process takes just a few minutes, but it can be a bit confusing. After downloading the plug-in (it’s available for Mac and Windows), I would recommend viewing the following videos for step-by-step instructions. I’ve also included a screen shot of the main settings below:
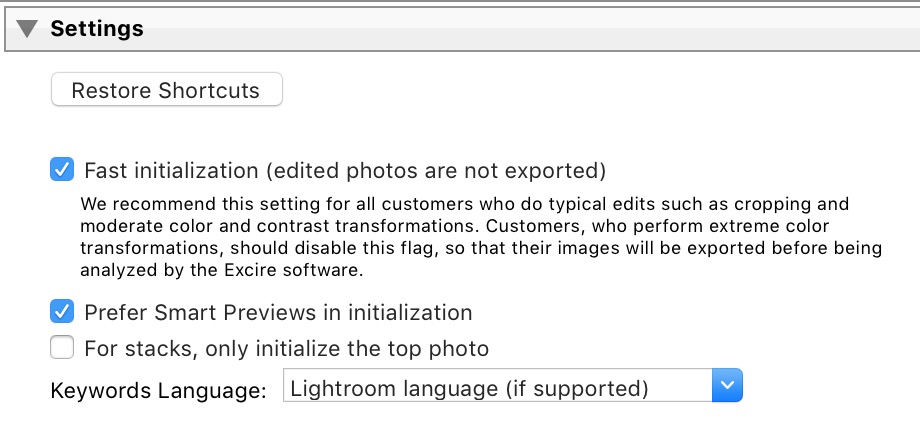
Caption: I chose to use the Fast initialization option because of the size of my catalog, but you might choose to uncheck that box if you make a lot of edits (especially if you convert a lot of images to black and white without first making Virtual Copies). Because I don’t use many stacks (stacks are very useful if you shoot a lot of panoramas in sections or multi-image HDRs), I unchecked the third box. And because I have generated a lot of Smart Previews over the years, I chose to “Prefer” them when initializing because the makers of the application say that can speed up the initialization process.
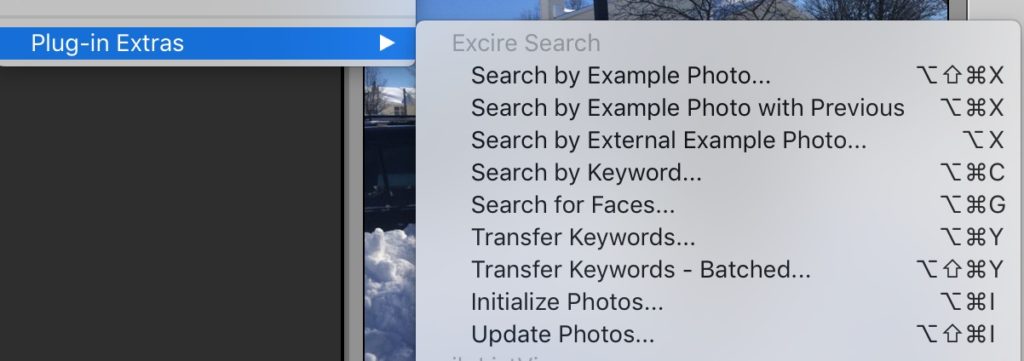
As you can see in the above video, searching by example photo is like magic! You just choose an image from your library (or an external image), then navigate to Library>Plug-in Extras>Search by Example Photo (or choose one of the other two Search by Example Photo options). Choosing Search by Example Photo with Previous will use the Previous Settings, such as how many results to display and whether to reference the example photo’s content or color. You can also search by Keyword or for Faces. In case you are wondering what “Update Photos” means (it’s the last item on the list under Excire Search), if you make large color or density changes (or convert images to black and white), you may want to choose the photos on which you made those edits and select “Update Photos.” The Excire Search engine will then look at those photos again and create new keywords.
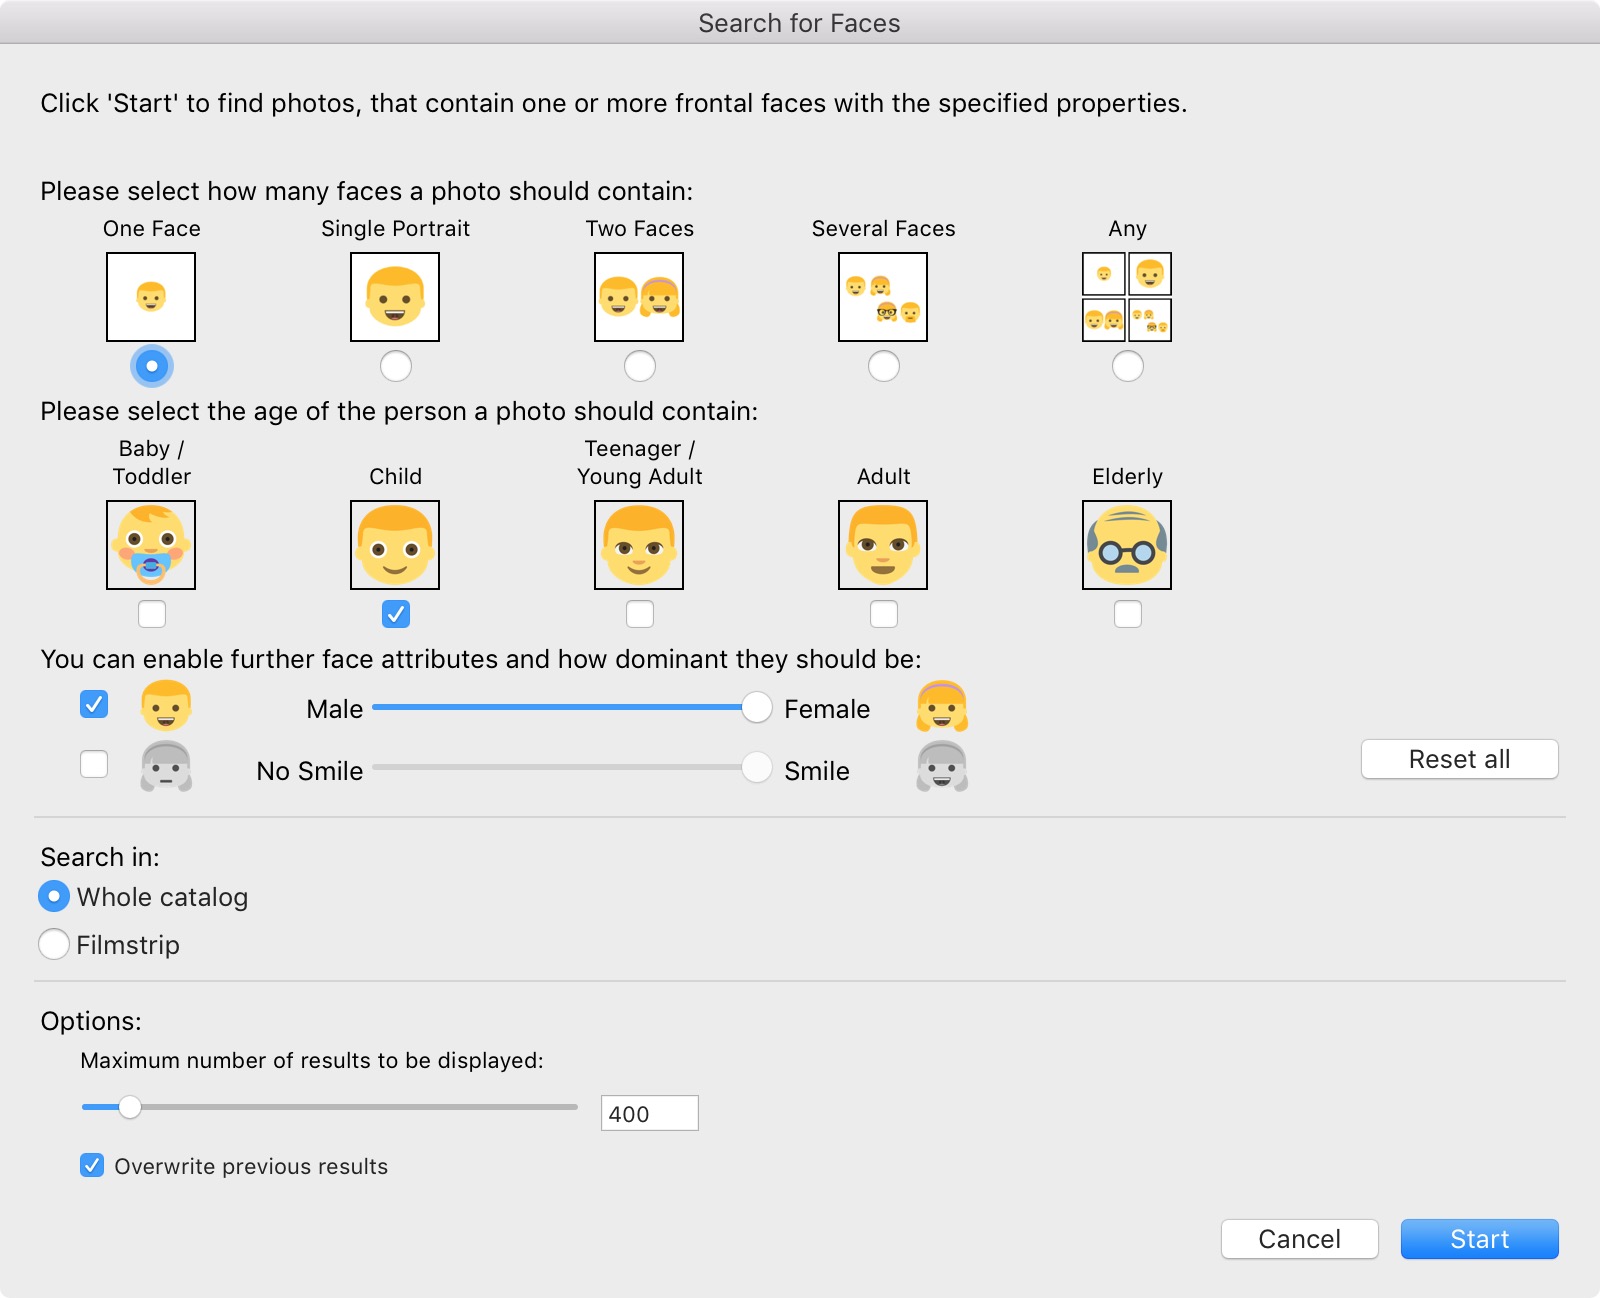
The Faces dialog box is so incredible to me. You can choose from a wide variety of different criteria, including the number of faces, an age range, male/female, and even whether or not people are smiling. I’ve included a screen shot below, and in my testing, it was extremely good at showing me images that closely matched what I requested (click on the image below to see the dialog box much larger). That being said, it was better at distinguishing between male and female faces for adults compared with children, which is very understandable (even the iPhone X’s face detection is less accurate with children’s faces compared with adult faces).
Pricing, Language and Availability (Plus a Special Offer for Our Readers)
Excire Search is available in two configurations: Excire Search (US $69) and Excire Search Pro (US $119). The plug-ins are identical except for the fact that Excire Search Pro draws from a larger group of keywords (about 500 vs. 125), and it also offers the ability to transfer keywords (individually or in bulk) that it creates into the Keyword List inside of a Lightroom catalog. For my workflow, the ability to transfer keywords is essential, so I am using Excire Search Pro.
Currently, the software is available in English and German. If you’d like to test out Excire Search or Excire Search Pro, visit this page for a free, fully functional 15 day trial. Also, if you decide to purchase Excire Search Pro, the company created a special 10% discount code for my readers: Just enter “AndrewPro10” (no quotes) at checkout.
I also noticed this text from the company’s site re: giving back: “A small portion of every purchased Excire Search download will be held in a special fund for support to a variety of nonprofits in the United States market. We’ll be developing our own Giving Back Advisory Board who will help us decide each year on a different charity needing more support.”
Conclusion
It’s difficult to express how happy I am with Excire Search Pro. It was like someone out there was listening to my prayers. (turns out it was a lot of very smart engineers!). I was told that the company is always doing research and working on how they can improve the software, and I look forward to seeing how it develops over time.
Related Articles
One of the best things about the internet and blogs is that I can reference other articles about Excire Search that I found useful. One review of Excire search that’s at the top of my list is by Bryan Esler that appeared on the excellent photo website: photofocus.com. You can read his review here. I’ve also had the honor of having a number of my articles published on the site over the years. There’s also a comprehensive article by the people who make Excire Search on the topic of speed and accuracy with different technologies that automatically generate keywords. You can find that article here.
If you’d like to test out Excire Search or Excire Search Pro, visit this page for a free, fully functional 15 day trial. And if you like it and decide to purchase the plug-in, there’s a special 10% discount code for our readers: Just enter “AndrewPro10” (no quotes) at checkout.
(Full Disclosure: Apart from being provided a license code for Excire Search Pro, I was not compensated in any way for writing this article. Please note that this article may contain affiliate links to the Excire Search website, which means that I may be compensated if a purchase is made after clicking through or by using a promo code. If you would prefer not to use my links, just visit your favorite search engine and type in: “Excire Search.”
Photo Gallery and Info from the Epson Digital Couture Project Event in New York City, Plus News About the 2018 Event
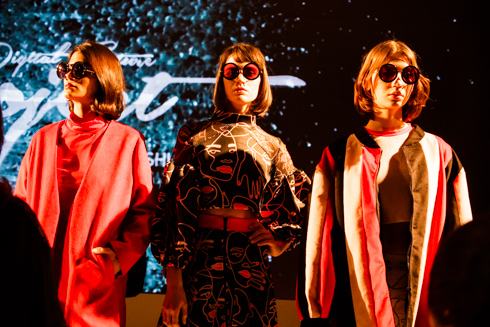
At the 3rd Annual Epson Digital Couture Event. Designer: Daniela Hoehmann. Photo © Andrew Darlow
I’ve been photographing people as a professional photographer and writer for over 25 years, but I’ve always focused more on catalog, advertising, product reviews and beauty salon-related work than runway shows and similar events that often occur during Fashion Week in Manhattan in February every year. However, last year I could not pass up an opportunity to attend an invitation only special event sponsored by Epson called the Digital Couture Project. On February 6, 2018, the 4th Annual Epson Digital Couture Project is happening once again, and I expect it to be just as impressive as the 2017 event.
Since this is not a topic I cover a lot here on imagingbuffet.com, I think I should mention who I think will get the most from this article:
• Anyone who wants to see cutting-edge fashion from designers around the world. To me, it’s like a global art exhibition, but with the designers expressing their art through their textile designs, and with male and female models serving as moving canvases. Two words kept coming to mind as I was looking at the wide range of textiles, color palettes and unique approaches to fabric printing: “Truly Incredible!”
• Anyone who has an interest in any type of garment printing, from direct-to-fabric printing (using printers like Epson’s SureColor F2000 and F2100), to dye-sublimation transfer printing (using printers like Epson’s SureColor F9370, F6200 and F7200). Once you see how these machines work, it’s easier to understand the technology and capabilities. I’ve included a YouTube video from Epson below that shows how an image can go from artwork on a screen to a design on fabric by first printing on a dye-sublimation transfer paper (in this case using an Epson SureColor F6200 printer), and then using a heat press to transfer the art to a fabric.
The video below offers a sneak peek into the 2017 event, and I especially like how they interview the designers who created the clothing:
Epson created an excellent overview of the 2018 event, its designers and the printers used for the project HERE.
Also, below is a GIF (courtesy of Epson) showing many of the featured collections from the 2018 event, as well as a list of the designers who participated:
- Brazil – Lua Luá (Michele Gevaerd)
- Canada (Toronto) – Hayley Elsaesser
- Chile – Karyn Coo
- Ecuador – Stephanie Ruiz
- Guatemala – Eduardo Figueroa
- Mexico – Emilio Mata
- Paraguay – Ilse Jara
- Peru – Ana María Guiulfo
- Colombia – Lina Cantillo
- United States (Los Angeles) – Candice Cuoco
- United States (Miami) – Fernando Alberto
- United States (Philadelphia) – Thomas Jefferson University (Alexandra Pizzigoni and Patricia Franklin)
- United States (New York) – threeASFOUR (Gabriel Asfour, Angela Donhauser and Adi Gil)
A selection of the fashions created by the designers listed above for the 2018 Epson Digital Couture event
For More About the Tech Behind the Fashion
The Epson SureColor printers listed earlier can also be used to print on transfer paper that can then be used with a heat press to create dye-sublimation metal prints (extremely popular these days), jewelry, snowboards, skateboards and much more. This page has much more on that, including information on how to request a free printed sample. Below is one of the Epson SureColor printers that was set up at the Digital Couture Project. It shows a few designs printed on dye-sublimation media prior to transferring the images to one or more fabrics using a heat press.’
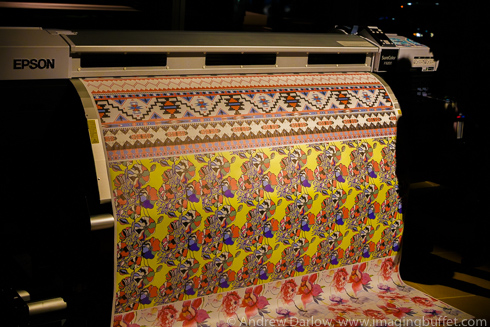
An Epson SureColor F9200 Printer at the Digital Couture Project event. Photo ©Andrew Darlow
Fashion designers and professionals (such as those who run print service bureaus), who are interested in Epson’s digital printing technologies can visit www.proimaging.epson.com for more information.
The Photographs
There are a few things that I should note about these photos. First, I used a Canon EOS 6D full frame 35mm DSLR for all of them. The 6D is outstanding in low light, allowing for the use of about ISO 1200-3200 with little to no visible noise in the shadow areas. If there is noise, it tends to be very “grain-like” without a lot of different colors, so it’s easy to reduce in Lightroom or other software. To increase my odds of getting sharp images, I used a combination of Shutter Priority Mode (set at between 1/1oo and 1/200 sec) with Auto ISO because I was relying on available light that was constantly changing, and not on or off-camera flash or LED lighting. I like the natural look that results from that approach, but it did mean that many of my photos had to be taken at ISO 3200 because the lens’ maximum (most open) aperture is f/4.5-6.3, depending on where in the zoom range the photos are being taken.
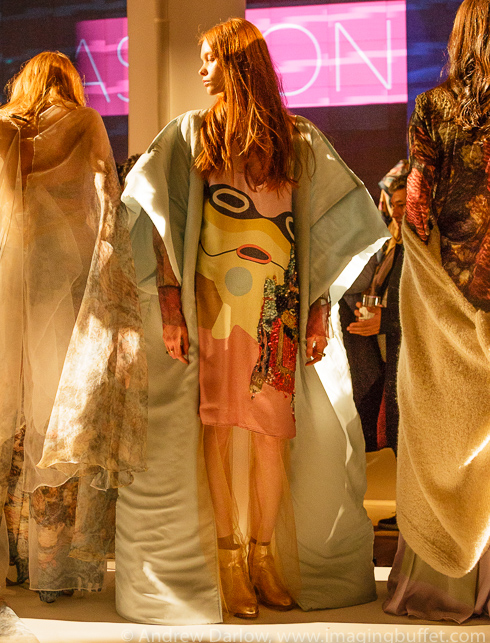
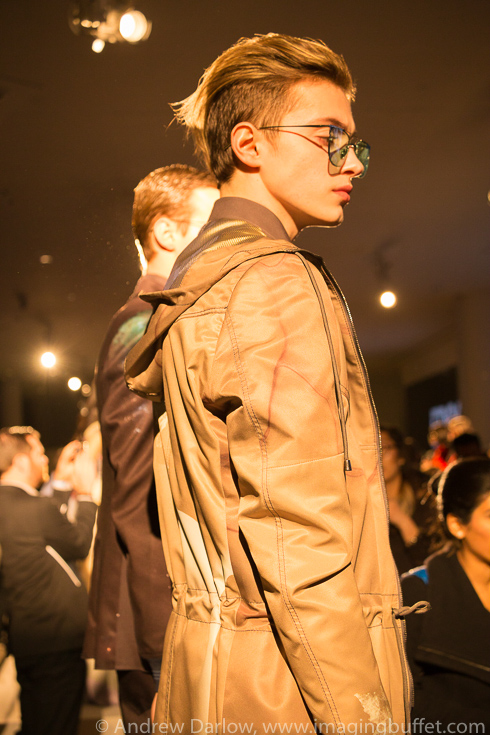
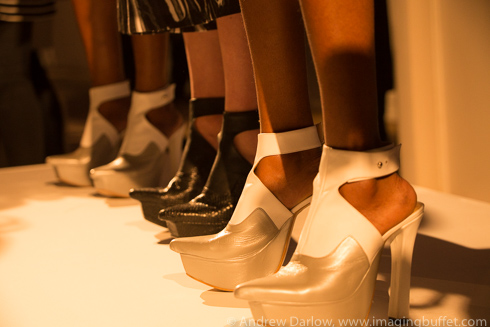
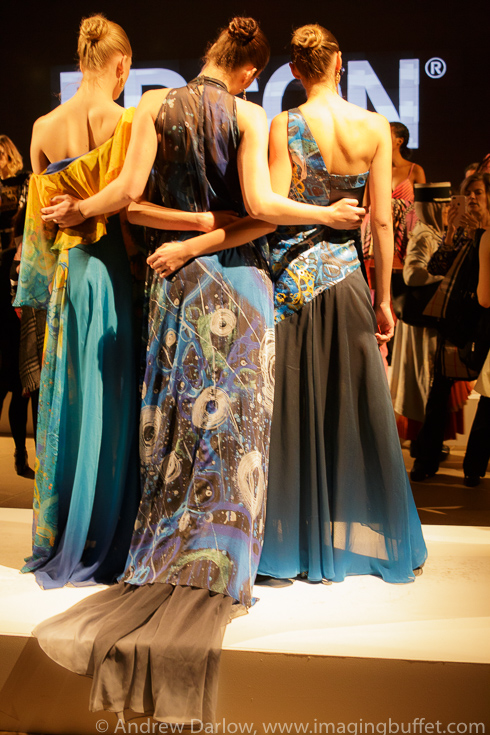
I also used just one lens for the entire shoot. It’s a beast of a lens due to its size and weight (approximately 4.1″ x 8.6″ (10.41 x 21.84 cm) and 4.33 lb (about 2 kg)), but I love it: the Sigma 50-500 f/4.5-6.3 APO DG HSM OS Lens For Canon EOS (it’s available in other mounts as well). It’s incredibly versatile due to its range, and I found the results to be very sharp at all focal lengths. As you can probably see from the images below, I enjoy taking photos from different angles, including from the back, as well as close-ups of items like shoes, which may or may not have been digitally printed like all of the other clothing. Some of the footwear by some of the designers was definitely printed digitally, which you can see in the video overview posted above. I believe that taking photos from behind a model, or when just one out of three of the models is facing forward, works very well because clothing is usually designed with attention to all of the “camera angles.”
And in case you are wondering here is the photo info for the image that opens this article and that shows designs by Daniela Hoehmann: 1/200 sec, f/4.5, ISO 3200.
Designer: Susan Wagner, 1/200 sec, f/4.5, ISO 3200, Photo © Andrew Darlow
Designer: Ricardo Pava, 1/200 sec, f/5, ISO 1600, Photo © Andrew Darlow
Designer: Sarah Richards, 1/200 sec, f/5.6, ISO 3200, Photo © Andrew Darlow
Designer: Vanesa Krongold, 1/200 sec, f/4.5, ISO 3200, Photo © Andrew Darlow
Designer: Susan Wagner, 1/125 sec, f/8, ISO 1250, Photo © Andrew Darlow
Designers: Daniel Del Barco and Sonia Chang, 1/100 sec, f/5, ISO 2500, Photo © Andrew Darlow
Designers: Miguel Moyano and Alex Polo, 1/100 sec, f/5.6, ISO 2000, Photo © Andrew Darlow
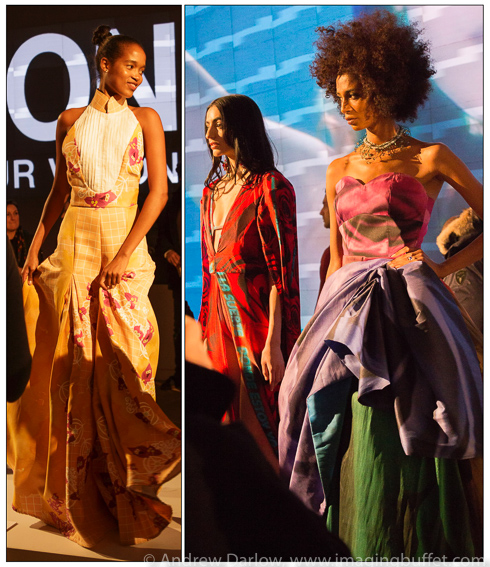
(Right Photo) Designer: Leonardo Mena, 1/200 sec, f/4.5, ISO 3200, Photo © Andrew Darlow
My PhotoPlus Expo 2017 Quick Review: What to See and Do

The 2017 PhotoPlus Expo is upon us and once again it’s a fantastic show. As I had mentioned in my last post, this year is a bit different for me because I decided to exhibit this year (I’m in Booth #673), which has been a lot of fun. That means, of course, that I had much less time to spend on the show floor. However, I’d like to highlight a few booths that I highly recommend visiting a few things I recommend doing at the show.
I should probably start with a link to my 2016 PhotoPlus Expo Show Report, which you can find HERE, because most of the companies I highlight are at the show again this year.
Have Your Camera Checked and Cleaned for Free
Many of the camera companies at the show are offering to check your camera and clean the sensor for free. I’d recommend visiting your camera maker’s booth as soon as you get to the show to see if they are offering the service, and how long it will take. Remember that you won’t have a camera for that time period, so you might want to bring another camera if you want to use it for the many photo opportunities around the Expo.
Show Floor Presentations
There are many, many presentations happening throughout all three days of the show on the Expo floor. I would recommend checking online first to see what’s scheduled for the companies in which you are interested. If you can’t find the schedules posted, I would just take a photo of the schedules for any specific company when you first come into the show, then decide which ones you want to attend.
Two companies that I have schedule info for, and that I’d like to highlight are Canon (Booth #121) and Epson (Booth #707). I especially want to highlight Epson because of the outstanding speakers that both companies have at the show during their “Epson Print Academy.” For example, on Friday from noon-1pm Mac Holbert, a fantastic teacher and pioneer in the world of archival inkjet printing will be speaking at the Epson booth, followed by John Paul Caponigro, also a pioneer in the world of digital imaging and fine-art printing. Even years after it was published, I still highly recommend to my students and clients the video training series by Mac Holbert and John Paul Caponigro titled: Fine Art Digital Workflow, which you can find HERE.


Robert Farber Exhibition and Blazing Editions

At the Icon Gallery featuring the work of Robert Farber at PhotoPlus Expo. photo © Andrew Darlow
Last night there was a special event in the exhibition area in the Icon Gallery (Booth #1101, shown above during the event) highlighting the incredible work of Robert Farber. Farber was named the featured photographer in the Blazing Editions/ChromaLuxe Collaborator Series: 2017 Master on Metal, and the show should not be missed. I also highly recommend visiting Blazing Editions’ Booth (#665) at the show to see some massive, stunning images from John Paul Caponigro, Jay Maisel, and other outstanding photographers. You can read more about the exhibition HERE. There you will also find the other cities where the show will be traveling.
Now I need to jump in my car and get back to the show!
If you don’t receive my email updates, feel free to sign up below. You will also receive three workflow videos and a guide to help you select the right file sizes for making fine-art or other prints.