
Excire Search: A Groundbreaking Search and Auto Keyword Tool for Lightroom – Hands-On Review

For the past 15 years or so I’ve been helping people organize, backup and print their photographs. And the one thing that has been a challenge for almost everyone (including me!) is keywording. It’s just not a lot of fun (for most people) to go through thousands (or hundreds of thousands) of images and videos and assign appropriate keywords to them. But keywording images and videos can pay huge dividends in the long run because having a collection with good keywords means that you can more easily find images for personal projects, client work and stock photography licensing.
Face recognition inside of Lightroom and other programs has helped quite a bit, but it’s far from perfect. And of course, not every photo has a recognizable person in it, so we have been faced with a problem in need of a solution. Until now.
The solution I’m referring to is a Lightroom Classic CC plug-in called Excire Search. And it does more than just automatically create keywords.
What it Does
Excire Search works via a Lightroom plug-in to “initialize” or look through your image collection one image at a time so that it can then use the image information to both create keywords and allow for creative searches by keyword or even via a sample image uploaded from your computer. It can initialize 10,000-20,000 images per hour (according to the software’s developer), but it depends on your system and whether you have already created Smart Previews. I didn’t time the process exactly, but Excire Search Pro initialized just over 400,000 images in my catalog on a MacBook Pro over a period of 4-6 days (I stopped the process a few times to take my computer with me, and I had very few Smart Previews in my catalog before starting the process). While it was initializing, I was still able to work on my computer and inside Lightroom. You can run a new initialization at any time, and it will quickly recognize which photos have already been initialized.
In case you’d like a quick look at how good the automatic keywording can be, I was very impressed by what the software came up with for one of my photos that included hot air balloons (click on the image to see the keywords much larger):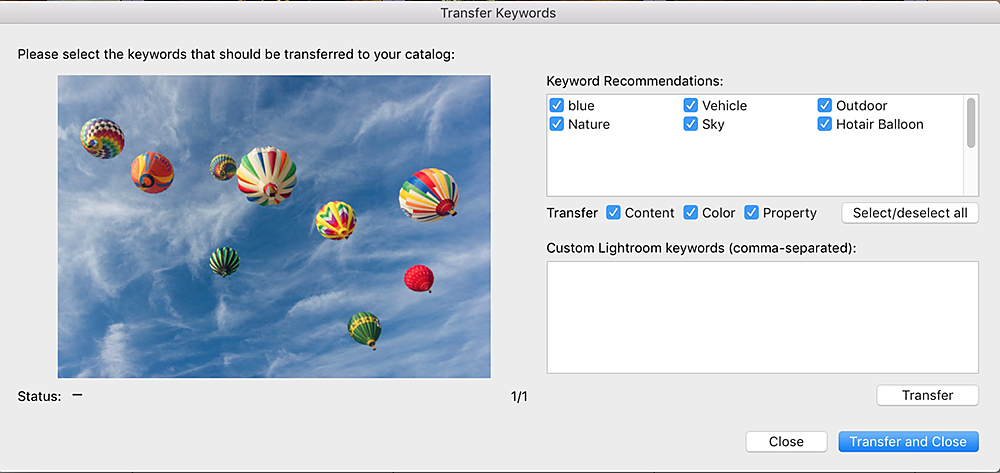
Getting Started
Installing the Excire Search Plug-in, setting preferences and starting the initialization process takes just a few minutes, but it can be a bit confusing. After downloading the plug-in (it’s available for Mac and Windows), I would recommend viewing the following videos for step-by-step instructions. I’ve also included a screen shot of the main settings below:
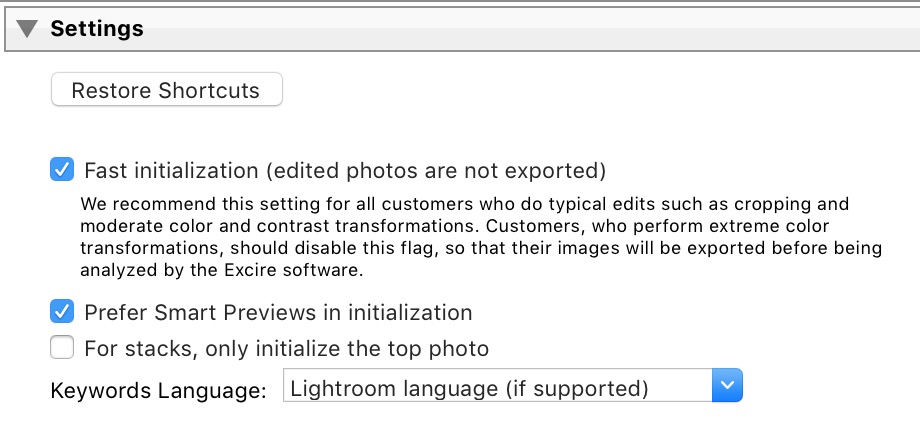
Caption: I chose to use the Fast initialization option because of the size of my catalog, but you might choose to uncheck that box if you make a lot of edits (especially if you convert a lot of images to black and white without first making Virtual Copies). Because I don’t use many stacks (stacks are very useful if you shoot a lot of panoramas in sections or multi-image HDRs), I unchecked the third box. And because I have generated a lot of Smart Previews over the years, I chose to “Prefer” them when initializing because the makers of the application say that can speed up the initialization process.
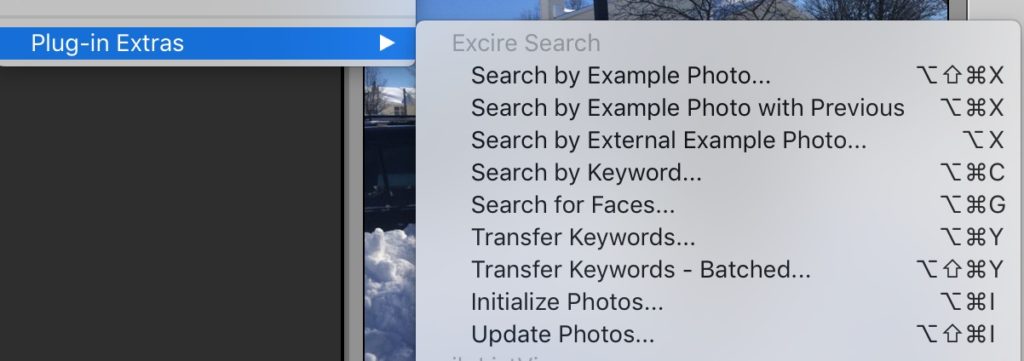
As you can see in the above video, searching by example photo is like magic! You just choose an image from your library (or an external image), then navigate to Library>Plug-in Extras>Search by Example Photo (or choose one of the other two Search by Example Photo options). Choosing Search by Example Photo with Previous will use the Previous Settings, such as how many results to display and whether to reference the example photo’s content or color. You can also search by Keyword or for Faces. In case you are wondering what “Update Photos” means (it’s the last item on the list under Excire Search), if you make large color or density changes (or convert images to black and white), you may want to choose the photos on which you made those edits and select “Update Photos.” The Excire Search engine will then look at those photos again and create new keywords.
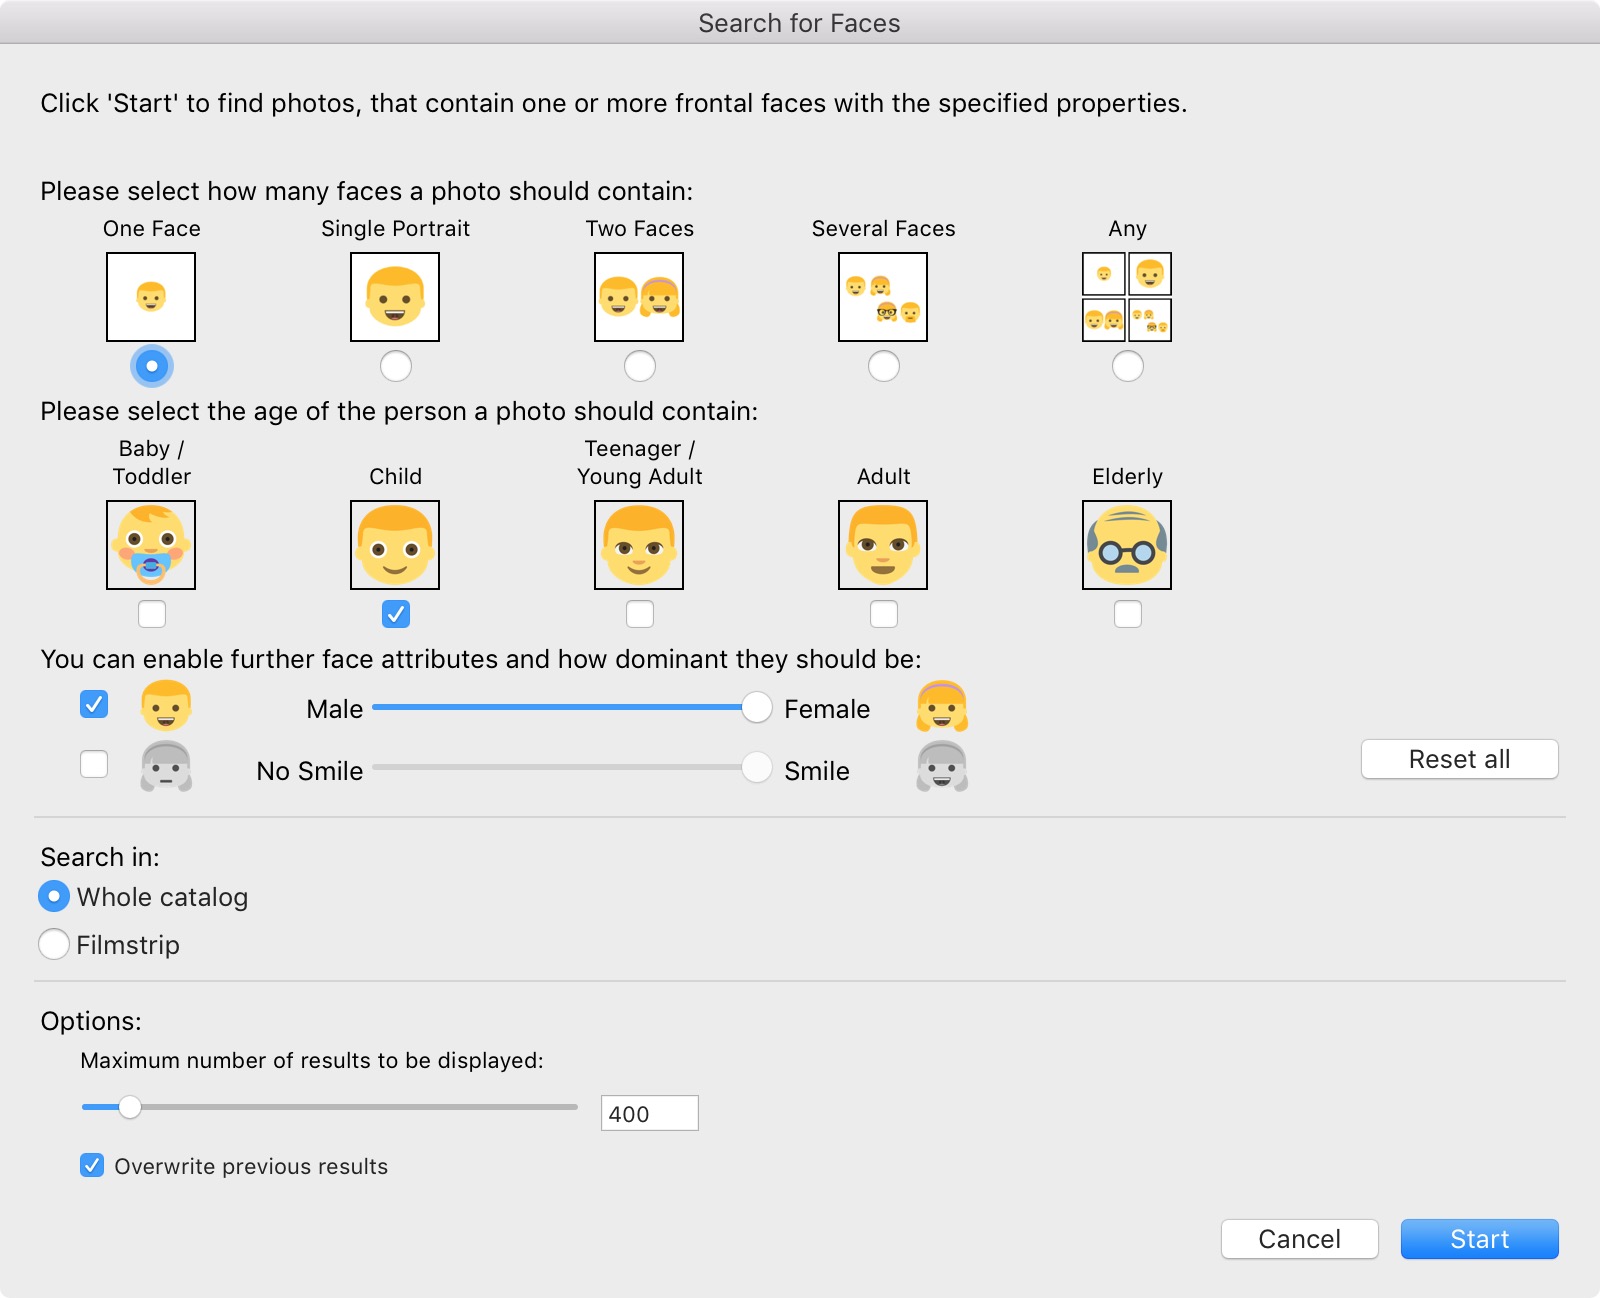
The Faces dialog box is so incredible to me. You can choose from a wide variety of different criteria, including the number of faces, an age range, male/female, and even whether or not people are smiling. I’ve included a screen shot below, and in my testing, it was extremely good at showing me images that closely matched what I requested (click on the image below to see the dialog box much larger). That being said, it was better at distinguishing between male and female faces for adults compared with children, which is very understandable (even the iPhone X’s face detection is less accurate with children’s faces compared with adult faces).
Pricing, Language and Availability (Plus a Special Offer for Our Readers)
Excire Search is available in two configurations: Excire Search (US $69) and Excire Search Pro (US $119). The plug-ins are identical except for the fact that Excire Search Pro draws from a larger group of keywords (about 500 vs. 125), and it also offers the ability to transfer keywords (individually or in bulk) that it creates into the Keyword List inside of a Lightroom catalog. For my workflow, the ability to transfer keywords is essential, so I am using Excire Search Pro.
Currently, the software is available in English and German. If you’d like to test out Excire Search or Excire Search Pro, visit this page for a free, fully functional 15 day trial. Also, if you decide to purchase Excire Search Pro, the company created a special 10% discount code for my readers: Just enter “AndrewPro10” (no quotes) at checkout.
I also noticed this text from the company’s site re: giving back: “A small portion of every purchased Excire Search download will be held in a special fund for support to a variety of nonprofits in the United States market. We’ll be developing our own Giving Back Advisory Board who will help us decide each year on a different charity needing more support.”
Conclusion
It’s difficult to express how happy I am with Excire Search Pro. It was like someone out there was listening to my prayers. (turns out it was a lot of very smart engineers!). I was told that the company is always doing research and working on how they can improve the software, and I look forward to seeing how it develops over time.
Related Articles
One of the best things about the internet and blogs is that I can reference other articles about Excire Search that I found useful. One review of Excire search that’s at the top of my list is by Bryan Esler that appeared on the excellent photo website: photofocus.com. You can read his review here. I’ve also had the honor of having a number of my articles published on the site over the years. There’s also a comprehensive article by the people who make Excire Search on the topic of speed and accuracy with different technologies that automatically generate keywords. You can find that article here.
If you’d like to test out Excire Search or Excire Search Pro, visit this page for a free, fully functional 15 day trial. And if you like it and decide to purchase the plug-in, there’s a special 10% discount code for our readers: Just enter “AndrewPro10” (no quotes) at checkout.
(Full Disclosure: Apart from being provided a license code for Excire Search Pro, I was not compensated in any way for writing this article. Please note that this article may contain affiliate links to the Excire Search website, which means that I may be compensated if a purchase is made after clicking through or by using a promo code. If you would prefer not to use my links, just visit your favorite search engine and type in: “Excire Search.”
Alien Skin Software’s Exposure X3 Overview and News on Exposure X4
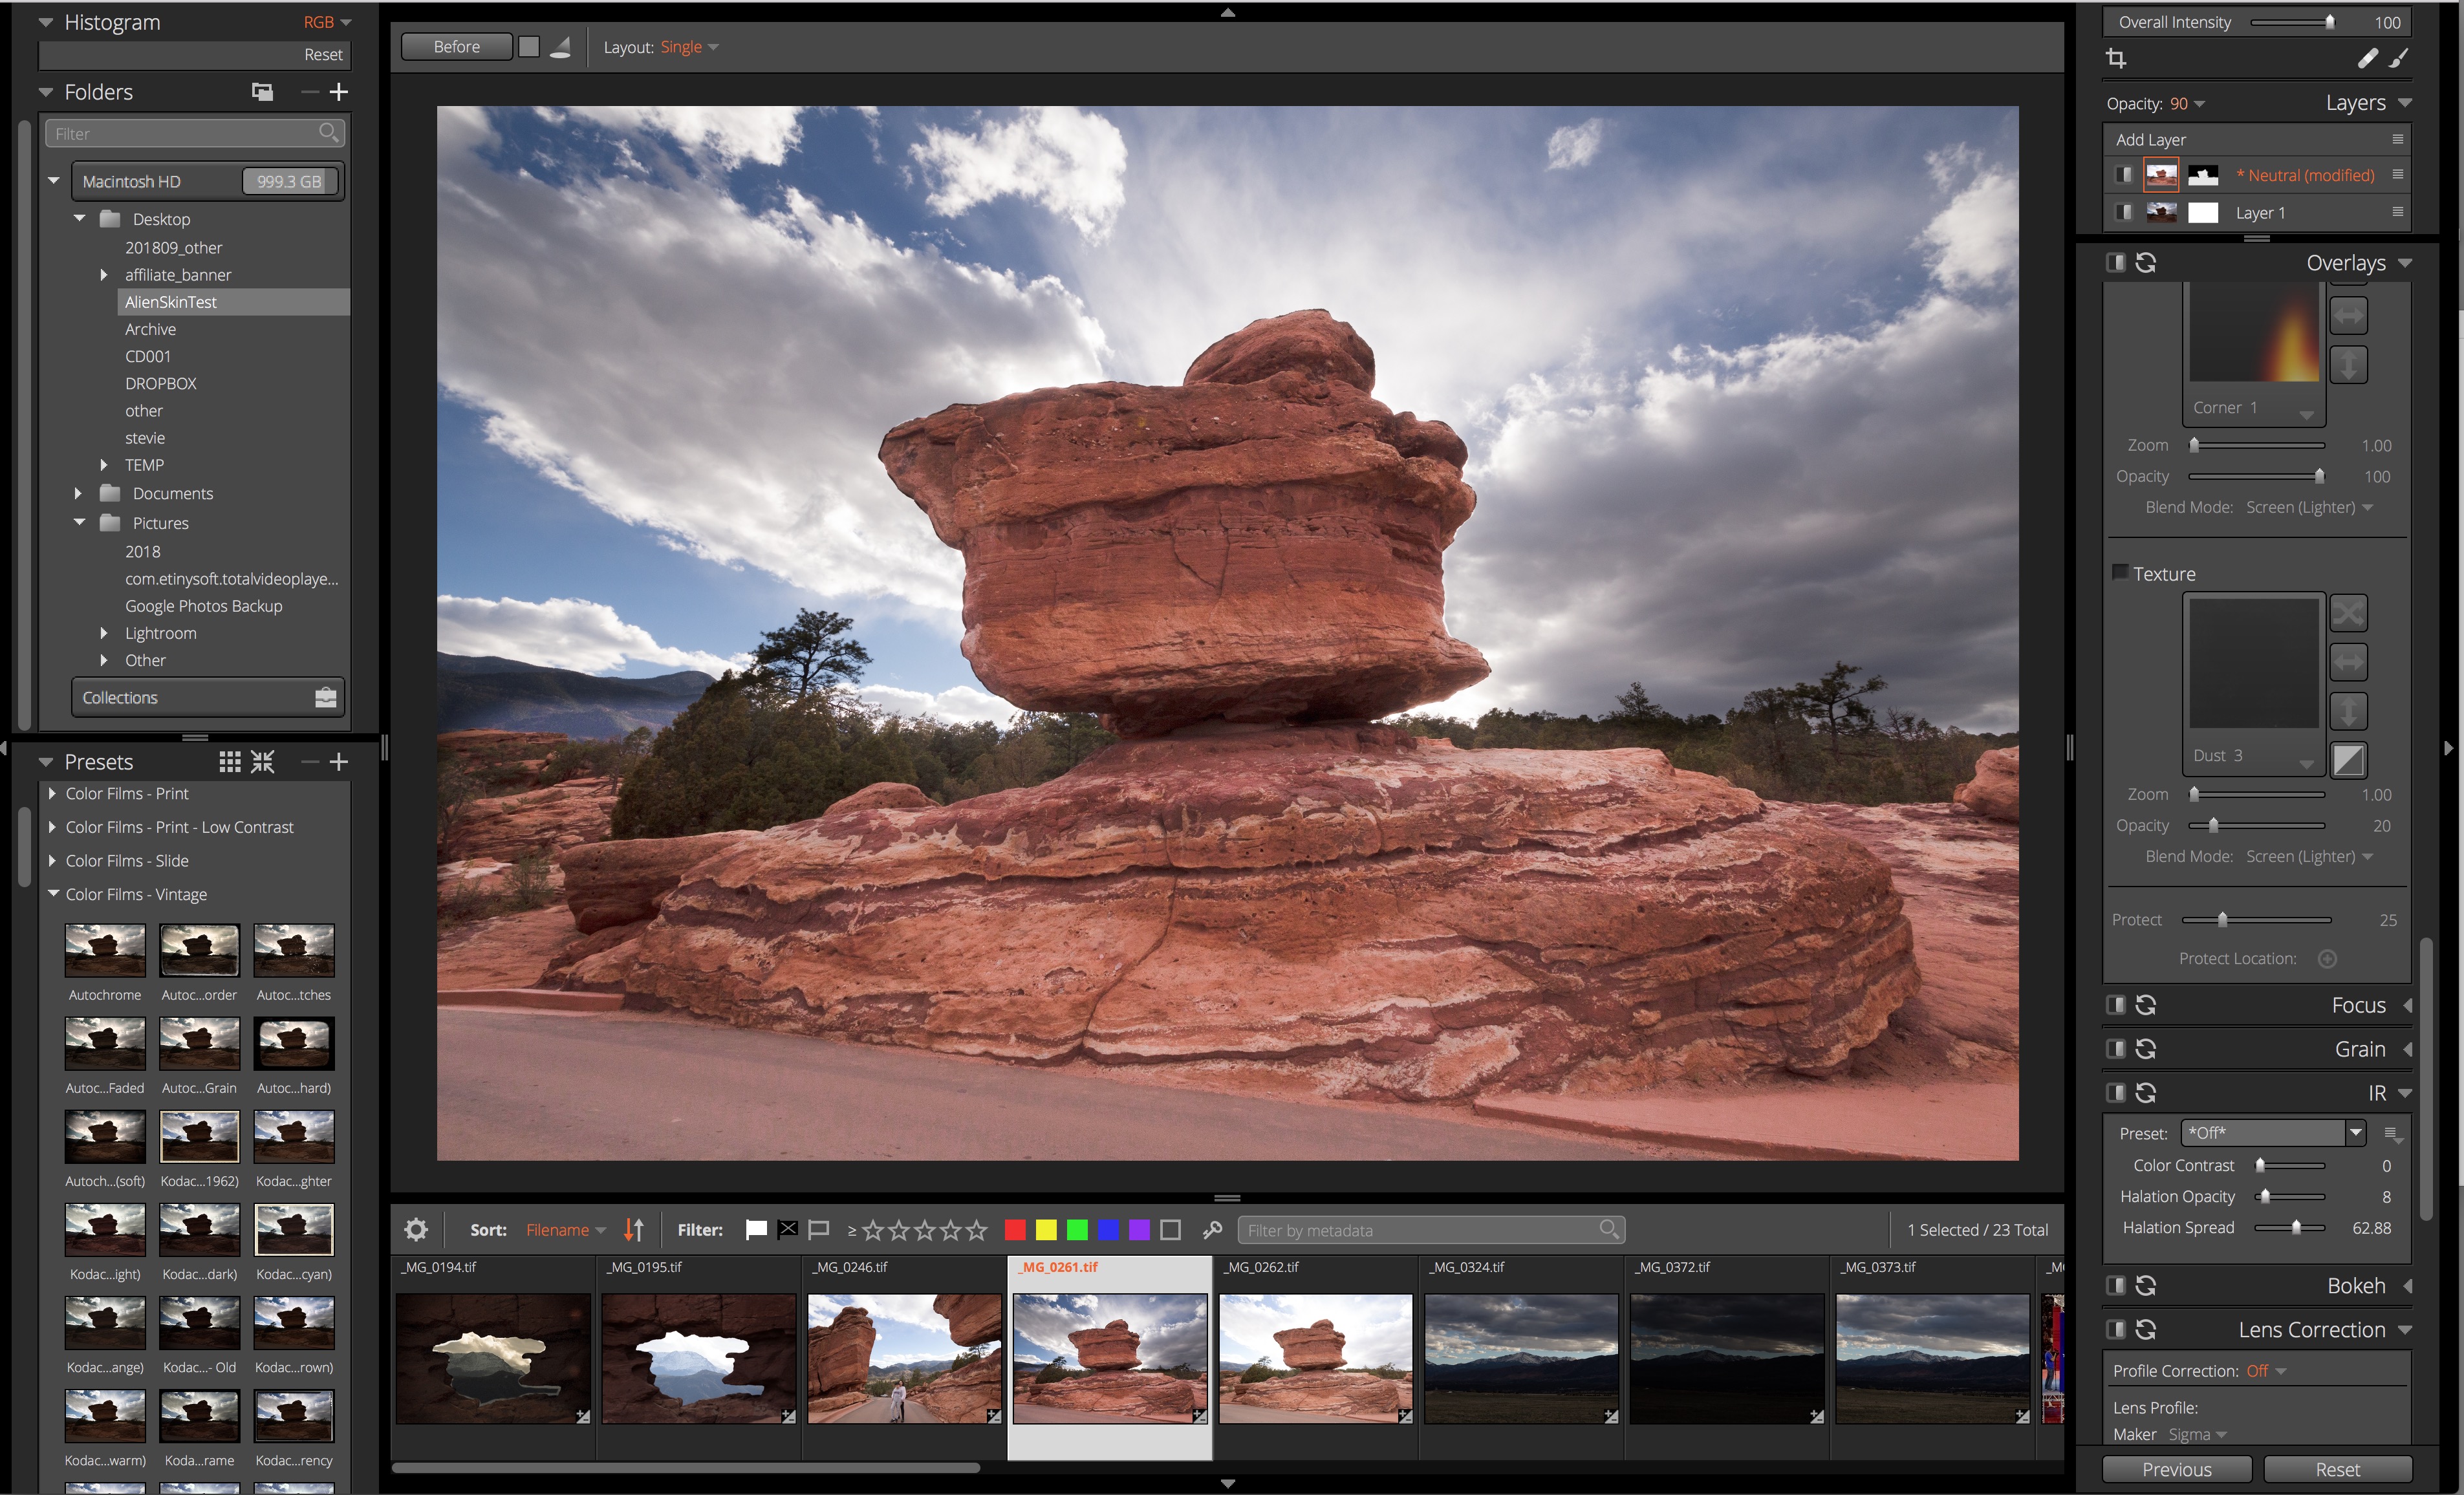
One of my photographs inside Exposure X3 after I applied a mask and lightened the rocks and road in the foreground. Photo © Andrew Darlow
There is definitely no shortage of image processing software on the market today (especially software that can convert RAW camera files in ways similar to Adobe Camera Raw and Adobe Photoshop Lightroom). It’s amazing how many companies are working to make the process faster and/or more feature-rich, which is great for anyone who works with photography or other artwork.
In this article, I’m going to highlight Alien Skin Software’s Exposure X3, a non-destructive RAW editor and organizer. I will include some videos that I found very helpful as I navigated the interface and worked on some of my images. I will also list some of the software’s features that really stood out in my mind. At the end of the article, I will talk a little about the next version of the software, which will be called Exposure X4.
Exposure X3 First Impressions
If you are a longtime Lightroom user like me, I think you will feel comfortable with many aspects of the user interface inside of Exposure X3. The software can be run in standalone mode, as a Plug-in inside of Photoshop, or as an external editor in Lightroom or a number of other applications. I chose to run it in standalone mode (by launching the application from my Applications folder), and it was up and running in just a few minutes. One of the things that took time for me to get my head around was that there is no catalog needed to use the editor, but it acts very similarly to Lightroom, which requires a catalog. This means that you don’t have to import images; you just navigate to them and start working.
I recommend just dragging and dropping a folder that has images into the main editing window, and it will appear under the Folders panel. Because of this, I highly recommend not dragging in any files directly from your desktop. Instead, place them in a folder first, since the application will be adding the files it needs to a new folder inside the folder that is holding your RAWs, JPGs, PSDs, etc.
Video Tutorials
Below is an excellent overview of Exposure X3 by photographer and host of the Candid Frame, Ibarionex Perello. I’ve always enjoyed Ibarionex’ interview style, and his vast knowledge of various editing tools makes this video a very useful resource.
Below is a very good 6 minute overview of how to edit using Exposure X3:
I also really liked this portrait-based tutorial of Exposure X3:
And for many more video training tutorials from Alien Skin Software, visit this page.
Standout Features
The main reason why I’m writing this article is because I was very impressed by many of the features that are inside the application. Here are just a few of them:
• Layers (Yes, layers!) This is at the top of the list because it allows layering similar to Photoshop, but nondestructively using a RAW file, meaning that you don’t have to create an 8- or 16-bit PSD or TIFF file to work in the application. This is a big deal because a 30 megapixel RAW file created by a modern DSLR or Mirrorless camera (to make the math easy), will become a 90MB TIFF in 8-bit and a 180MB TIFF file in 16 bit if you export it to work in another application. The Layers feature allow you to try different effects on different layers and use masking to adjust parts of an image. The main things you can’t do is have two different images on two separate layers. However, because RAW files can generally handle big exposure moves, you can place the same image on two layers, make adjustments to areas like skies or foregrounds on the top layer, and then mask out a section so that you get the best parts of each layer (or you can add the layer, then create a mask, then make the edits, as I did in the example I describe below. You can also add lighting effects to a layer, including radial or linear gradients. That makes turning the effect on or off just a simple button click.
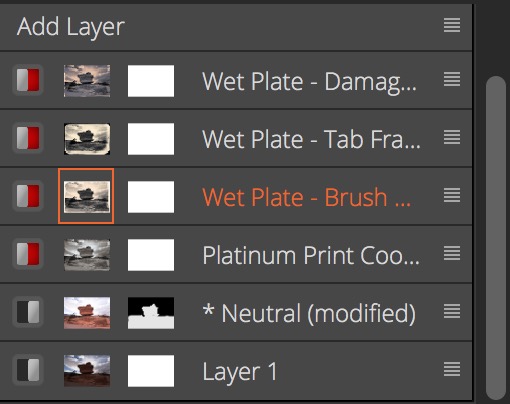
Exposure X3’s Layer Panel with my original image layer (bottom), a masked layer, and then a number of Presets shown separately in Layers (note that they are currently red, which means they are not activated).
• Color Filters Under the Color panel is the Color Filter tool. It’s a quick way to add toning just as if you were placing a translucent filter over your image. And when used on a layer, it’s particularly powerful. And I really like the tool tips that come up warning you, for example, that the mask needs to be inverted on a layer to see the effects of the color filter.
• Customizable Panels This one blew my mind! Imagine being able to set up your workspace much like you can do in Photoshop with its windows and panels. And with a simple click, a line will go through the name of the panel and it will be hidden from view.
• Overlays Exposure X3 has an Overlays panel that offers many creative options. The main sections are Border, Light Effect and Texture. I would think that in addition to photographers, designers (especially book cover artists) would love using these effects for a wide range of different uses. For my needs, I’m drawn to the border effects. I’ve purchased other software for hundreds of dollars just to be able to create different borders, and they were much more difficult to use. In Exposure X3. you just choose an image (I recommend creating a new layer for it), and start experimenting from scratch, right in the Overlays panel, or by using Presets that incorporate the Overlays.
This 18 second slide show shows how my image started out (I chose a version in which the sky was well-exposed, so the rocks and road were too dark). I then created a new layer and a layer mask (the mask is shown in red). I then brightened the rock and road using the tools in the Basic panel. After that, I had fun creating the images you see above. They were extremely easy to make using Exposure X3’s built-in Presets.
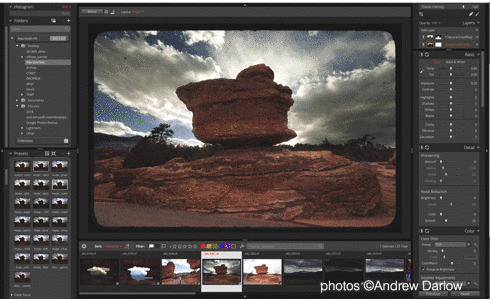
• Presets, Presets and more Presets! Did I mention that there are a lot of Presets that come pre-loaded with Exposure X3? They are absolutely fantastic, and greatly increase the value of the software in my opinion. Many Presets emulate the look of black and white and color film types, and I got lost in them for quite a while. I should also note that in addition to exposure, color, etc., Presets can be saved with Exposure X3’s incredible Overlays (see above for more about Overlays). This is heaven for any designer or photographer who loves the look of distressed images like those that have scratches, or the look of platinum-palladium prints that have been created by hand coating papers or other substrates. Once you find a look that you like, you can tweak it and then save it as a Preset.
Another nice touch re: Presets is that each preset’s effect can be tested on a full screen image just by hovering over it. When you want to apply one or more presets to an image, I recommend clicking on the brush icon (located just above the Layers panel) and checking the box under Preset called “on a new layer” so that you can keep adding presets to your layer stack (see screen shot above under “Layers”. That allows you to have multiple Presets on multiple layers. You can turn them on and off, and you can dial the opacity of any of them to reduce the effect. This is similar to having multiple Virtual Copies, but without having to keep track of multiple images inside of the application. I should note that you also have the option of making Virtual Copies if you like.
There is another excellent way to see multiple presets applied to the same image and placed side-by-side (a maximum of 6 different presets can be shown in this way). It’s called Audition mode, and of course, there’s a video tutorial for it (see below) :
• IR Panel This is another fantastic option inside Exposure X3. IR stands for Infrared, and the tool emulates the glow that you often see when using infrared films. It’s ideal for both black and white and color portraits, or for any other photograph or drawing to which you’d like to add a “dream-like” feeling.
• Export Profiles A very nice “added touch” that the developers included in Exposure X3 is a collection of Export Presets for a wide variety of social media and popular photo portfolio sites like Zenfolio and SmugMug. These can be very helpful and save a lot of time and disk space when you need to export your work out to a folder before uploading to one of those services since the resolution and JPEG compression is already set for you (though you can edit the settings and save a new Preset).
Exposure X3 Pricing and 30 Day Free Trial
Alien Skin Exposure X3 is available in two configurations:
• Exposure X3 (US $149), and the
• Exposure X3 Bundle (US $199), which includes Exposure X3, Snap Art, and Blow Up. Blow Up is an incredible application that can enlarge your images quite a bit while retaining good detail and minimal or no visible artifacts. No software that upsizes your images is perfect, but if you give it a good quality image to start with, there’s a very good chance you will be impressed by the results once you dial in your settings. Snap Art is an application that focuses on transforming photos or other artwork in many different ways. For example, you can make a photo look like an oil painting, watercolor, etc. It normally sells for US $99 by itself. For more on Snap Art, visit this page.
If you’d like to try out Alien Skin Exposure X3 for free for 30 days, visit this page.
Exposure X4 Information and Upgrade
Alien Skin Software recently announced that a new version of Exposure named Exposure 4 will be coming soon. The company also announced that it will be sending free copies of Exposure X4 to anyone who purchased Exposure X3 (or the Exposure X3 Bundle) on or after July 1, 2018. If you purchased any version of Exposure before July 1, your current license code qualifies you for an upgrade price of $99.
Here is a list of new and/or updated features that are slated for Exposure X4 (Source: Alien Skin Software’s Blog)
- Improvements to Exposure’s RAW processing system.
- Perspective and keystone correction to minimize or eliminate optical distortion.
- Enhanced light effects that you can move and rotate freely anywhere in your image.
- Smart collections that automatically populate based on photo criteria that you choose.
- Faster file exporting and launch times.
- Lightroom migration tool that brings your Lightroom organizational metadata over into Exposure.
- Monitored folders that support tethered shooting workflows.
- New printing presets.
- Support for new cameras and lenses.
- Expanded workflow options for image copying and exporting.
Conclusion
Overall, I am extremely impressed by Alien Skin Software’s Exposure X3 application and look forward to what’s coming in Exposure X4. I can definitely see people using this application as a replacement for other RAW editors and organizers. Will I be giving up Lightroom? No (at least not for now). I currently still prefer to use Lightroom for the vast majority of my culling, editing, keywording and printing, especially since I’ve been using it for over five years, and my main catalog has over 400,000 images. But I will definitely turn to Exposure X3 when I want to edit images using the application’s powerful Layers panel, or when I want to explore the application’s incredible Preset and Overlay options. I can see a lot of Lightroom users doing the same.
If you’d like to try out Alien Skin Exposure X3 for free for 30 days, visit this page.
——-
(Full Disclosure: Apart from being provided a license code for the Exposure X3 Bundle, I was not compensated in any way for writing this article. I plan to purchase Exposure X4 when it is released, and look forward to sharing my experiences with it. Please note that this article contains affiliate links to the Alien Skin software site, which means that I may be compensated if a purchase is made, but pricing will be the same as if you had navigated directly to Alien Skin Software’s site. If you would prefer not to use my links, just visit your favorite search engine and type in: “Alien Skin Software Exposure X3”
PhotoPlus Expo 2017 Returns to NYC – Free Expo Passes and Meet Me at Booth 673!
Hello! I’m excited to announce that I will be exhibiting under my new consulting company name, Andrew Darlow’s WorkflowSchool.com, at the PhotoPlus Expo 2017 in New York City next week from Thursday, 10/26 to Saturday, 10/28. If you haven’t visited the show before, it’s the largest photography trade show in North America, and it’s filled with photo- and video-related gear, free expo floor talks, model and still-life photo opportunities, and much more. I should also note that even if you can’t attend the show, you can sign up for updates on the show site (link is on the bottom right) to get news updates and special offers from PDN (Photo District News) and photo-related companies.


Free expo floor talks like this one at Sony’s booth is an example of what you can experience at the PhotoPlus Expo.
I’ve had the honor to speak at the show in the past on the topics of Lightroom and Inkjet Printing, and I thought this year would be a perfect opportunity for me to have a booth at the show so that I could answer any questions about the content in my new book, Focus and Filter (Ulysses Press), and let people know about how I might be able to help them with their workflow, from capture to print.

Yours truly holding an LED light unit at the PhotoPlus Expo 2016. Photo credit: Whitey Warner
With that, I have two items to share with you below. The first is a link to a free three-day trade show pass and 15% off the cost of a 1,3, or 4 day Conference Pass. However, the Conference Pass is completely optional. I’ve found the paid conference seminars to be excellent, but there are many educational opportunities available right on the show floor:
Click here for a link to a 3-DAY TRADE SHOW PASS
and the second is a link to set up a five minute quick meeting with me at my booth (#673). I have been to many trade shows, and it’s easy to start speaking with one person and have others waiting to talk to the same person. Instead, I decided to set up a system with more than 50 available times so that I could meet with a lot of people at the show. Feel free to bring a copy of any of my books if you’d like me to sign them…if you don’t mind the value of them possibly going down  , and I’ll have copies of Focus and Filter available at the show for purchase.
Click here to schedule a FREE 5 MINUTE MEETING with me at the show. Everyone who meets with me will receive a WorkflowSchool.com backpack and some other goodies that I think you will really like. If you schedule a meeting, there is one question on the signup form re: whether you would like to purchase a copy of Focus and Filter at the show, so that I know about how many copies to bring.

A few sample images from Focus and Filter. Photos © Andrew Darlow
Even if you decide not to meet with me at the show, or if the times are not good for you, please stop by Booth #673, and I may be free to chat. An assistant or I will be giving away empty sandbags and info from Focus and Filter on how to easily fill them. I decided to give away hundreds of sandbags at the show because I wanted to shed some light on the subject of using sandbags (especially when using light stands outside or to support backdrops). I’ve seen what can happen if sandbags are not used, and it can be especially dangerous if there are pets or children around.
And this year, for the first time, the PhotoPlus Expo will be co-located with the NYVR Expo. Your Expo pass allows you to see what they have on their show floor (Friday and Saturday are their trade show days). Feel free to share this post and/or the link to register for a free pass with your friends or family. Here’s a link to the show’s policies, including minimum age requirements for attendees.
If you’d like to see my Show Report from last year’s Expo, visit this page.
The PhotoPlus Expo only comes around once a year, and I hope to see you there!
All the best,
Andrew
P.S. If you’d like to download a PDF sample from Focus and Filter, which includes the Table of Contents and some tips from the book, visit this page.
P.P.S. I also welcome you to join any of our three Meetup Groups if you would like to be invited to attend other events like photo walks, workshops, etc. in the future.
https://www.meetup.com/The-Art-of-Photography-and-Photoshop/
https://www.meetup.com/nj-shore-shooters/
https://www.meetup.com/NY-NJ-Photoshoot-Club/
P.P.P.S. If you don’t receive my ImagingBuffet.com newsletter updates and would like to receive them, as well as some Lightroom and workflow videos, you can sign up here.