
1
How to Protect Any Camera LCD for about $10
Hello! I’ve recently begun to send out a weekly photo tips newsletter (you can sign up here to start receiving it). One of the recent tips that I shared was: Use Glass LCD Protectors on all of your LCD screens.
This may be one of those “I wish I had done that” tips for you. If you look at all of your camera LCD screens (the part on the back that displays video and/or stills), and if you see any scratches on any of them, you almost definitely could have avoided them by using a thin, self-adhesive glass LCD protector. That being said, I’ve been amazed at how the appearance thin scratches get reduced dramatically when I put an LCD protector on. To find them online, just search on your favorite camera store’s website or other retailer for “Glass Protective Screen Guard,” or “Glass Screen Protector,” or “Glass LCD Screen Protector” and your specific camera name. Cost will be about $5-30 each. I recommend buying two (they often come in packs of two), and try to work in a dust-free location. Also, keep the screen on by pressing the play button before you apply it so that you can more easily align it properly.
I would also remove the lens and place a body cap on the camera so that it’s easier to work on a flat surface. If at first you don’t succeed placing it properly, try, try again! I like to line it up on the left side of the lcd and carefully place it without touching the sticky part. In the video below, the person applying the glass cover shows how you can use the two alignment stickers. It may or may not be helpful on camera LCDs if your glass covers come with the stickers, but it’s worth trying.
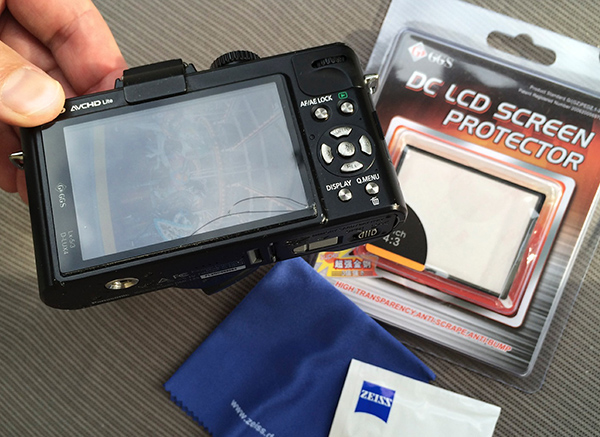
My small Panasonic DMC-LX5 camera was saved thanks to an LCD Glass Protector (shown above after the damage was done). I dropped it at an amusement park onto pavement from about two feet. I’m amazed that the camera survived with just a cracked screen protector, and a small scratch to the metal near the Display button! Of course, if it had fallen a different way, the screen may not have made a difference, but using it might just save your camera one day.
The glass protectors go on like stickers and can be removed without damaging the LCD (I can’t personally guarantee that, but I have never had any problems after using them on my cameras, smartphones and tablets for at least the last five years). And if you want to be a “ninja,” you can measure the entire area of the screen and any additional border, and find a protector that might be for another camera because sometimes the glass covers made for specific cameras will cover most, but not all of the glass on the back of your camera.
Here’s a good video that shows how to install a glass screen protector on a Smartphone. I highly recommend using these on smartphones, especially since most people don’t have a neck strap or other type of strap connected to their smart phone.
UPCOMING LIGHTROOM WORKSHOP
I’m really looking forward to returning to the NJ Media Center in Berkeley Heights, NJ to teach this workshop on Lightroom workflow and editing:
Mastering Lightroom Workflow: From File Organization to Effortless Manipulations w/ Andrew Darlow
Date: Sun. 6/24/2018
Lightroom Classic CC offers many powerful features, but without a good foundation and understanding of its tools, it’s easy to get frustrated. In this full day lecture and hands-on workshop, I will focus on helping you get the most from your images from start to finish.
Here’s what one participant had to say about the workshop: “I’m a full-frame DSLR camera user and I have a considerable amount of experience with Photoshop. However, I didn’t know how to organize my photographs properly, and I was getting frustrated trying to edit my photos inside of Lightroom. The full-day workshop had a lot of information, but it was very well presented, in an easy to follow way. Andrew is extremely professional and he managed a very diverse group, keeping everyone happy and on-course, which is not easy. I picked up a lot of editing tips and shortcuts that would have been much more time consuming for me to research online on my own.” – Branch Watkins
PhotoPlus Expo 2017 Returns to NYC – Free Expo Passes and Meet Me at Booth 673!
Hello! I’m excited to announce that I will be exhibiting under my new consulting company name, Andrew Darlow’s WorkflowSchool.com, at the PhotoPlus Expo 2017 in New York City next week from Thursday, 10/26 to Saturday, 10/28. If you haven’t visited the show before, it’s the largest photography trade show in North America, and it’s filled with photo- and video-related gear, free expo floor talks, model and still-life photo opportunities, and much more. I should also note that even if you can’t attend the show, you can sign up for updates on the show site (link is on the bottom right) to get news updates and special offers from PDN (Photo District News) and photo-related companies.


Free expo floor talks like this one at Sony’s booth is an example of what you can experience at the PhotoPlus Expo.
I’ve had the honor to speak at the show in the past on the topics of Lightroom and Inkjet Printing, and I thought this year would be a perfect opportunity for me to have a booth at the show so that I could answer any questions about the content in my new book, Focus and Filter (Ulysses Press), and let people know about how I might be able to help them with their workflow, from capture to print.

Yours truly holding an LED light unit at the PhotoPlus Expo 2016. Photo credit: Whitey Warner
With that, I have two items to share with you below. The first is a link to a free three-day trade show pass and 15% off the cost of a 1,3, or 4 day Conference Pass. However, the Conference Pass is completely optional. I’ve found the paid conference seminars to be excellent, but there are many educational opportunities available right on the show floor:
Click here for a link to a 3-DAY TRADE SHOW PASS
and the second is a link to set up a five minute quick meeting with me at my booth (#673). I have been to many trade shows, and it’s easy to start speaking with one person and have others waiting to talk to the same person. Instead, I decided to set up a system with more than 50 available times so that I could meet with a lot of people at the show. Feel free to bring a copy of any of my books if you’d like me to sign them…if you don’t mind the value of them possibly going down  , and I’ll have copies of Focus and Filter available at the show for purchase.
Click here to schedule a FREE 5 MINUTE MEETING with me at the show. Everyone who meets with me will receive a WorkflowSchool.com backpack and some other goodies that I think you will really like. If you schedule a meeting, there is one question on the signup form re: whether you would like to purchase a copy of Focus and Filter at the show, so that I know about how many copies to bring.

A few sample images from Focus and Filter. Photos © Andrew Darlow
Even if you decide not to meet with me at the show, or if the times are not good for you, please stop by Booth #673, and I may be free to chat. An assistant or I will be giving away empty sandbags and info from Focus and Filter on how to easily fill them. I decided to give away hundreds of sandbags at the show because I wanted to shed some light on the subject of using sandbags (especially when using light stands outside or to support backdrops). I’ve seen what can happen if sandbags are not used, and it can be especially dangerous if there are pets or children around.
And this year, for the first time, the PhotoPlus Expo will be co-located with the NYVR Expo. Your Expo pass allows you to see what they have on their show floor (Friday and Saturday are their trade show days). Feel free to share this post and/or the link to register for a free pass with your friends or family. Here’s a link to the show’s policies, including minimum age requirements for attendees.
If you’d like to see my Show Report from last year’s Expo, visit this page.
The PhotoPlus Expo only comes around once a year, and I hope to see you there!
All the best,
Andrew
P.S. If you’d like to download a PDF sample from Focus and Filter, which includes the Table of Contents and some tips from the book, visit this page.
P.P.S. I also welcome you to join any of our three Meetup Groups if you would like to be invited to attend other events like photo walks, workshops, etc. in the future.
https://www.meetup.com/The-Art-of-Photography-and-Photoshop/
https://www.meetup.com/nj-shore-shooters/
https://www.meetup.com/NY-NJ-Photoshoot-Club/
P.P.P.S. If you don’t receive my ImagingBuffet.com newsletter updates and would like to receive them, as well as some Lightroom and workflow videos, you can sign up here.
How to Take a Screenshot on an iOS Device with a Single Screen Tap
There are many reasons why you might want to take a screenshot on your computer or smartphone. One of the main ones for those who love taking pictures is to crop a photo quickly (just pinch to zoom, take a snapshot of the photo, and a new cropped version of the photo will appear in your “All Photos” list.) The problem I was having recently was that I kept putting my iPhone 7 Plus into sleep mode instead of taking a screen shot when I pressed the sleep and home buttons at the same time (that’s the traditional way to take a snapshot on an iOS device). It seems more difficult now for me than it was when I used an iPhone 5S as my main phone.
Below is a step-by-step procedure for setting up your iOS device so that you can take a screenshot in one screen tap (well, I should probably write “screen push” or “extended tap.” If you have a chance to try it out, you’ll know exactly what I mean.

The AssistiveTouch icon shown in the bottom right of an iPhone’s 5S screen, which makes it possible to take screen shots (and do other tasks), with two quick taps. Devices with 3D touch can do the same action with just one press.
I was also looking for a way to “bookmark” my favorite podcasts while on the go by taking a screenshot of the episode that’s playing in the Podcasts app. Taking a screenshot shows the exact place in the audio file or stream where I would like to return in the future. I was hoping Siri could help me with this, but I don’t think there is a way to take a screenshot using Siri (please let me know if you know of a way to do that). When I asked Siri to take a screen shot, she told me: “That may be beyond my abilities at the moment.”
Here are the steps to take a Screenshot on an iOS Device with a single Screen Tap (Please note: A Device with 3D Touch is needed for a single screen tap, but any iOS device with Assistive Touch should work fine if you are willing to tap twice):
STEP 1: Go to Settings>General>Accessibility. (See Fig. 1)

Fig. 1: Accessibility
STEP 2A: Scroll Down to AssistiveTouch and Turn it On. (See Fig. 2 and Fig. 3)

Fig. 2
STEP 2B: One More Thing Re: 3D Touch
If you want to make the 3D Touch “Push” action more sensitive (it takes less effort to make a screenshot), choose Light from the “Light, Med, Firm” scale in the 3D Touch menu. I find that Light is perfect whether I’m holding the phone or whether it is in a holder/mount.
STEP 3: Turn on AssistiveTouch, then press Customize Top Level Menu. (See Fig. 3)

Fig. 3
STEP 4: Under 3D Touch Action, Choose Screenshot from the menu items. (See Fig. 4)

Fig. 4
STEP 5: You will then see a white button with a black square background around it (about the same size as an app icon) appear on every screen you use (See Fig. 5). When you touch it, it gets much more contrasty, and it will then fade back to about 20% opacity. You can place it just about anywhere along the border of your device’s screen. Quick Tip: You can delete an app in the space where you place the button (or reorganize your apps in iTunes so that it doesn’t overlap with any of your apps).

Fig. 5: Notice the black square with the white button inside on the bottom right of my iPhone 5S’s screen. It gets much lighter when not pressed. Photo © Andrew Darlow
STEP 6: If the white button is annoying or you just want it to temporarily disappear, you can set up a triple-click action to turn it on and off under Accessibility>Accessibility Shortcut (it’s the last item in the list, as shown in Fig. 6). Then choose AssistiveTouch and triple click to your heart’s content!

Fig. 6: AssistiveTouch under the Accessibility Shortcut menu
If You Don’t Have 3D Touch on Your Device
Many iOS devices don’t have 3D Touch (you can tell that you don’t have it if the 3D Touch Action line is not shown on the screen in Fig. 4). However, you can achieve almost the same result, but you will need to press the screen twice. Once to open the Assistive Touch control (by pressing the white button) and once to choose Screenshot. You won’t be able to see the Screenshot icon by default in the menu (shown in Fig. 4), but you can add it quickly by pressing on any of the icons there (or add a new one by pressing the + key). Then choose Screenshot from the list of items.
Here’s an example of a screen shot captured during the show (at 11:28) from one of my favorite Podcasts, Mac Geek Gab (I highly recommend subscribing to the show (or just listening online) if you use any Mac or iOS device). The show is packed with practical advice, tech tips, gear reviews, etc.

A screenshot from the Mac Geek Gab podcast.
I hope that this was helpful to you and I welcome your comments!
Want More Apple- and Photo-Related Tips, Plus Lightroom Video Tutorials?
In case you don’t receive my free newsletters, you can start getting news, photo and printing tips and three one-hour Lightroom videos delivered to your in-box by signing up below (you can unsubscribe at any time and we respect your privacy)