How to Display Your File Names and Much More Over Your Photos in Lightroom Classic CC
Lightroom Classic CC is a fantastic application for cataloging photos, but because this feature is turned off by default, many people don’t realize that you can display important information about each photo, video or other image file in the Library Module just above each photo. To do that, we need to select the View Options menu item. Here’s a step-by-step tutorial for the process:
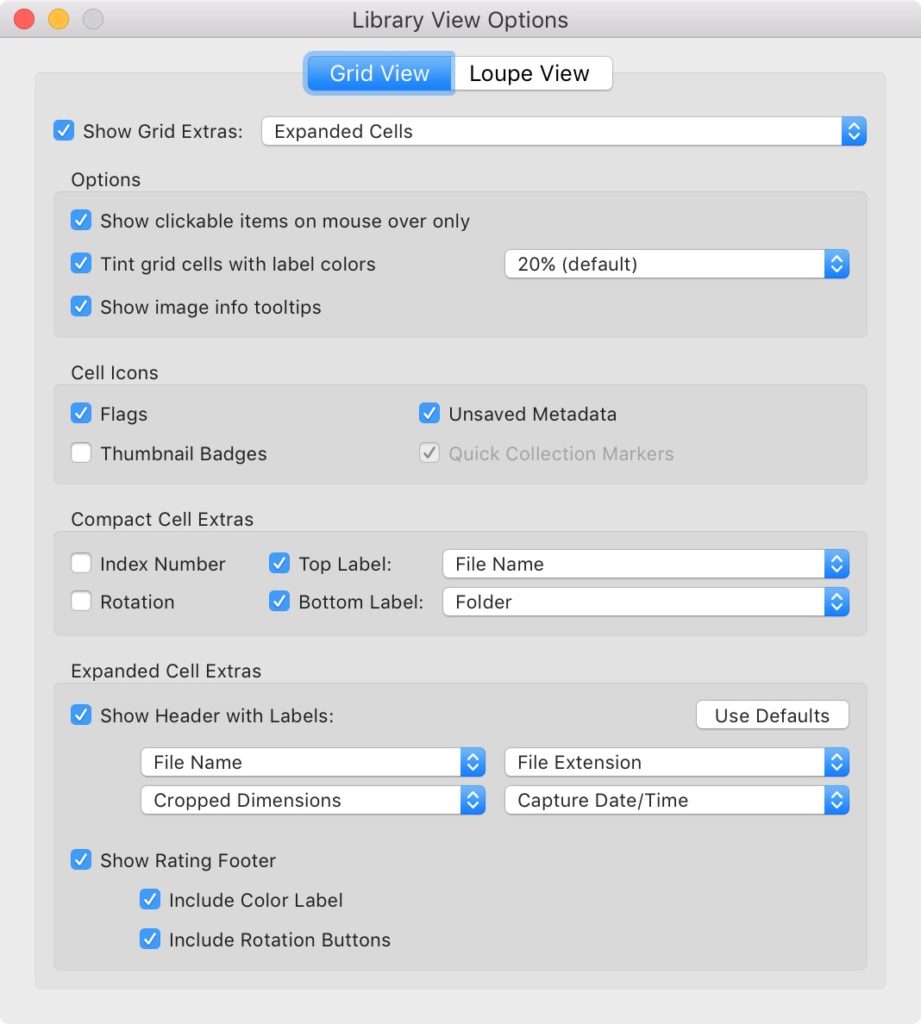
1. To access the Library View Options dialog box (shown below), choose View>View Options under the top menu. Then check Show Grid Extras and select Expanded Cells from the dropdown menu to add any four criteria from a large selection of options (Compact cells can hold up to two items).
2. There are a number of other options you can also choose, such as how strong a tint to apply to cells if you’ve chosen a color label for them, but the most important options to edit in my opinion can be found under Expanded Cell Options. There, you can select from many different choices, including the File Name, Extension (JPG, TIFF, RAW files, etc), Rating, and even camera EXIF data, such as Shutter Speed and ISO. You can see some of the options I commonly use in the screenshot. I also like to check Show Rating Footer with Include Color Label and Include Rotation Buttons selected, so that I can quickly see how many stars (or which label) I’ve assigned specific images.
EXTRA SUPER SECRET TIP!
Did you know that you can also right click (Control Click on Mac OS) on any of the criteria above any photo to change what’s displayed? I always look for time-saving tips like this!
I hope that this tip has been very helpful.
Would you like more tips like this delivered directly to your in-box?
If you don’t receive my email updates, I invite you to sign up below (if you are already signed up, the system will let you know). When you sign up, you will instantly receive links and passwords to three Lightroom workflow videos, PLUS a link to a guide to help you select the right file sizes for making fine-art or other prints.
UPCOMING LIGHTROOM WORKSHOP
I’m really looking forward to returning to the NJ Media Center in Berkeley Heights, NJ on Sunday, October 14, 2018 to teach the following full-day workshop on Lightroom editing and printing. I’m offering a 1 hr 45 minute follow-up one-on-one consultation (a $300+ value) for those who register by Friday, 10/5/2018.
Mastering Fine-Art Printing with Lightroom w/ Andrew Darlow
Date: Sun. 10/14/2018
Investment: $167 + $30 Materials fee (Total: $197)
Lightroom Classic CC offers many powerful features, but without a good foundation and understanding of its tools, it’s easy to get frustrated. In this full day lecture and hands-on workshop, I will focus on helping you get the most from your images from start to finish.
Here’s what one participant had to say about a similar workshop: “I’m a full-frame DSLR camera user and I have a considerable amount of experience with Photoshop. However, I didn’t know how to organize my photographs properly, and I was getting frustrated trying to edit my photos inside of Lightroom. The full-day workshop had a lot of information, but it was very well presented, in an easy to follow way. Andrew is extremely professional and he managed a very diverse group, keeping everyone happy and on-course, which is not easy. I picked up a lot of editing tips and shortcuts that would have been much more time consuming for me to research online on my own.” – Branch Watkins
View the Workshop PDF and Register Today!
—-
P.S. I also welcome you to join any of our three Meetup Groups if you would like to be invited to attend events like photo walks, workshops, etc. in the future.
https://www.meetup.com/nj-shore-shooters/
https://www.meetup.com/NY-NJ-Photoshoot-Club/
Alien Skin Software’s Exposure X3 Overview and News on Exposure X4
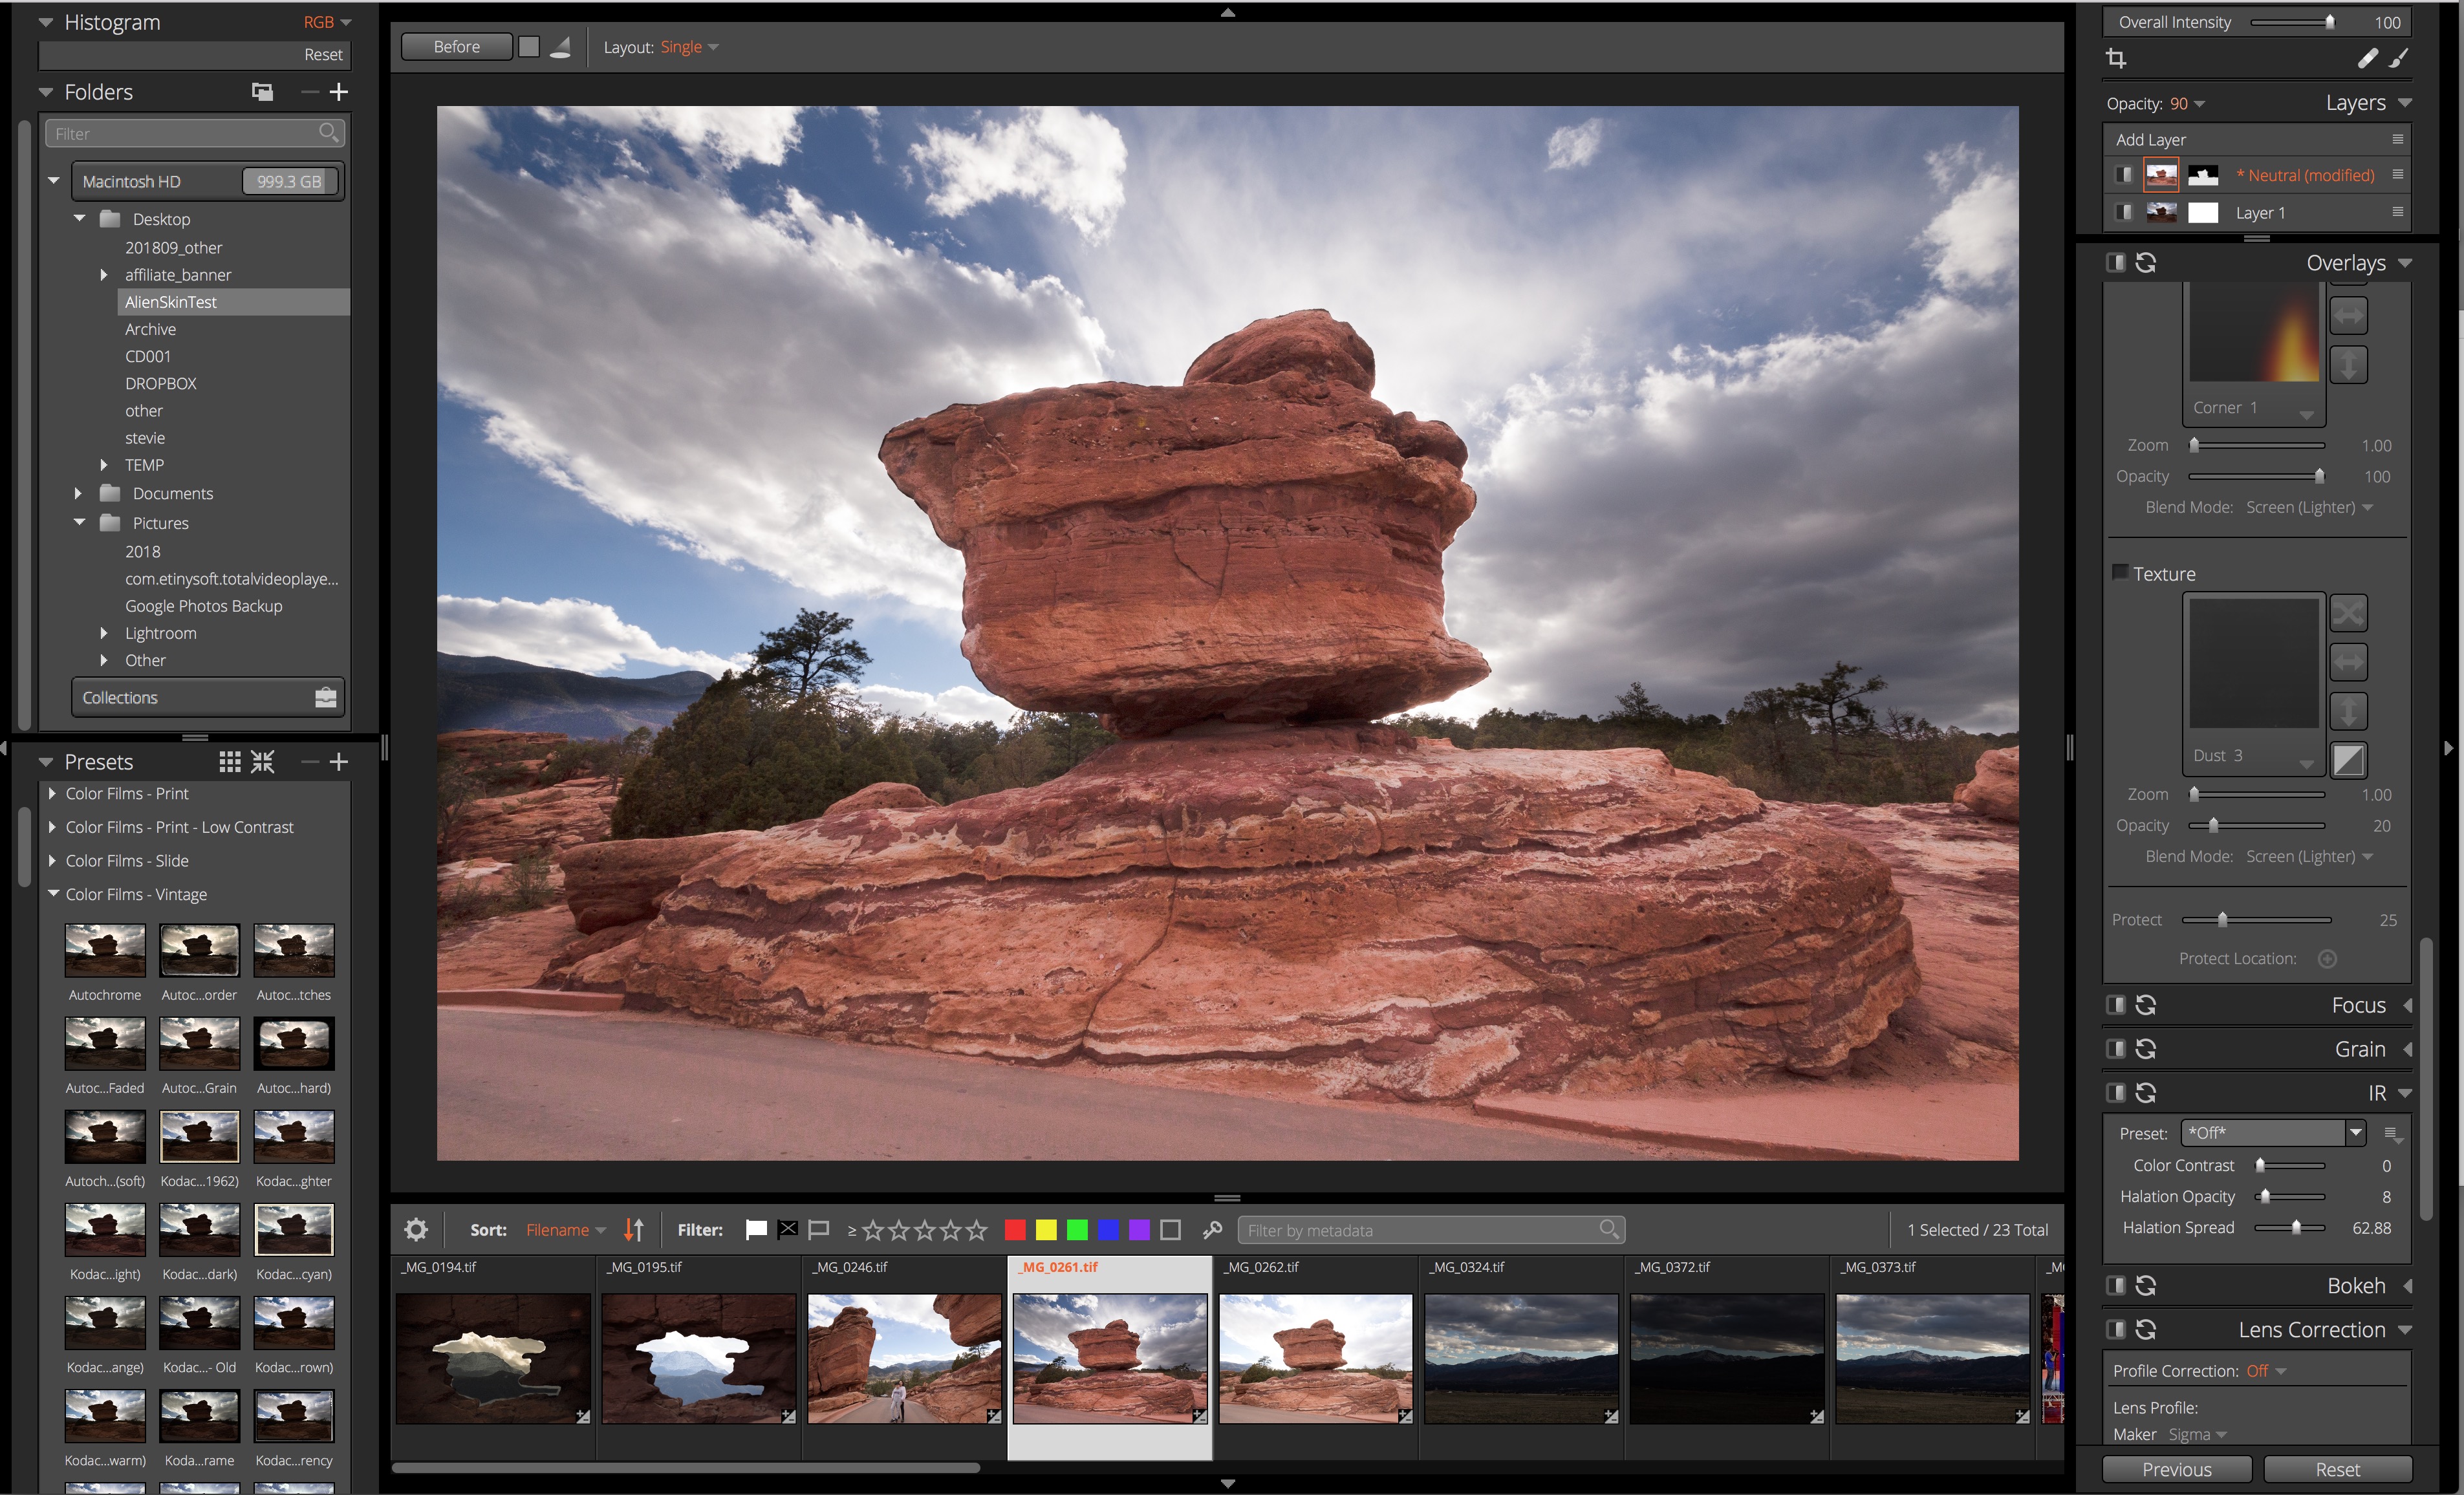
One of my photographs inside Exposure X3 after I applied a mask and lightened the rocks and road in the foreground. Photo © Andrew Darlow
There is definitely no shortage of image processing software on the market today (especially software that can convert RAW camera files in ways similar to Adobe Camera Raw and Adobe Photoshop Lightroom). It’s amazing how many companies are working to make the process faster and/or more feature-rich, which is great for anyone who works with photography or other artwork.
In this article, I’m going to highlight Alien Skin Software’s Exposure X3, a non-destructive RAW editor and organizer. I will include some videos that I found very helpful as I navigated the interface and worked on some of my images. I will also list some of the software’s features that really stood out in my mind. At the end of the article, I will talk a little about the next version of the software, which will be called Exposure X4.
Exposure X3 First Impressions
If you are a longtime Lightroom user like me, I think you will feel comfortable with many aspects of the user interface inside of Exposure X3. The software can be run in standalone mode, as a Plug-in inside of Photoshop, or as an external editor in Lightroom or a number of other applications. I chose to run it in standalone mode (by launching the application from my Applications folder), and it was up and running in just a few minutes. One of the things that took time for me to get my head around was that there is no catalog needed to use the editor, but it acts very similarly to Lightroom, which requires a catalog. This means that you don’t have to import images; you just navigate to them and start working.
I recommend just dragging and dropping a folder that has images into the main editing window, and it will appear under the Folders panel. Because of this, I highly recommend not dragging in any files directly from your desktop. Instead, place them in a folder first, since the application will be adding the files it needs to a new folder inside the folder that is holding your RAWs, JPGs, PSDs, etc.
Video Tutorials
Below is an excellent overview of Exposure X3 by photographer and host of the Candid Frame, Ibarionex Perello. I’ve always enjoyed Ibarionex’ interview style, and his vast knowledge of various editing tools makes this video a very useful resource.
Below is a very good 6 minute overview of how to edit using Exposure X3:
I also really liked this portrait-based tutorial of Exposure X3:
And for many more video training tutorials from Alien Skin Software, visit this page.
Standout Features
The main reason why I’m writing this article is because I was very impressed by many of the features that are inside the application. Here are just a few of them:
• Layers (Yes, layers!) This is at the top of the list because it allows layering similar to Photoshop, but nondestructively using a RAW file, meaning that you don’t have to create an 8- or 16-bit PSD or TIFF file to work in the application. This is a big deal because a 30 megapixel RAW file created by a modern DSLR or Mirrorless camera (to make the math easy), will become a 90MB TIFF in 8-bit and a 180MB TIFF file in 16 bit if you export it to work in another application. The Layers feature allow you to try different effects on different layers and use masking to adjust parts of an image. The main things you can’t do is have two different images on two separate layers. However, because RAW files can generally handle big exposure moves, you can place the same image on two layers, make adjustments to areas like skies or foregrounds on the top layer, and then mask out a section so that you get the best parts of each layer (or you can add the layer, then create a mask, then make the edits, as I did in the example I describe below. You can also add lighting effects to a layer, including radial or linear gradients. That makes turning the effect on or off just a simple button click.
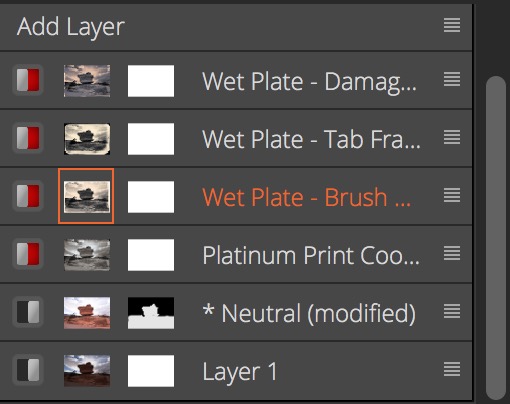
Exposure X3’s Layer Panel with my original image layer (bottom), a masked layer, and then a number of Presets shown separately in Layers (note that they are currently red, which means they are not activated).
• Color Filters Under the Color panel is the Color Filter tool. It’s a quick way to add toning just as if you were placing a translucent filter over your image. And when used on a layer, it’s particularly powerful. And I really like the tool tips that come up warning you, for example, that the mask needs to be inverted on a layer to see the effects of the color filter.
• Customizable Panels This one blew my mind! Imagine being able to set up your workspace much like you can do in Photoshop with its windows and panels. And with a simple click, a line will go through the name of the panel and it will be hidden from view.
• Overlays Exposure X3 has an Overlays panel that offers many creative options. The main sections are Border, Light Effect and Texture. I would think that in addition to photographers, designers (especially book cover artists) would love using these effects for a wide range of different uses. For my needs, I’m drawn to the border effects. I’ve purchased other software for hundreds of dollars just to be able to create different borders, and they were much more difficult to use. In Exposure X3. you just choose an image (I recommend creating a new layer for it), and start experimenting from scratch, right in the Overlays panel, or by using Presets that incorporate the Overlays.
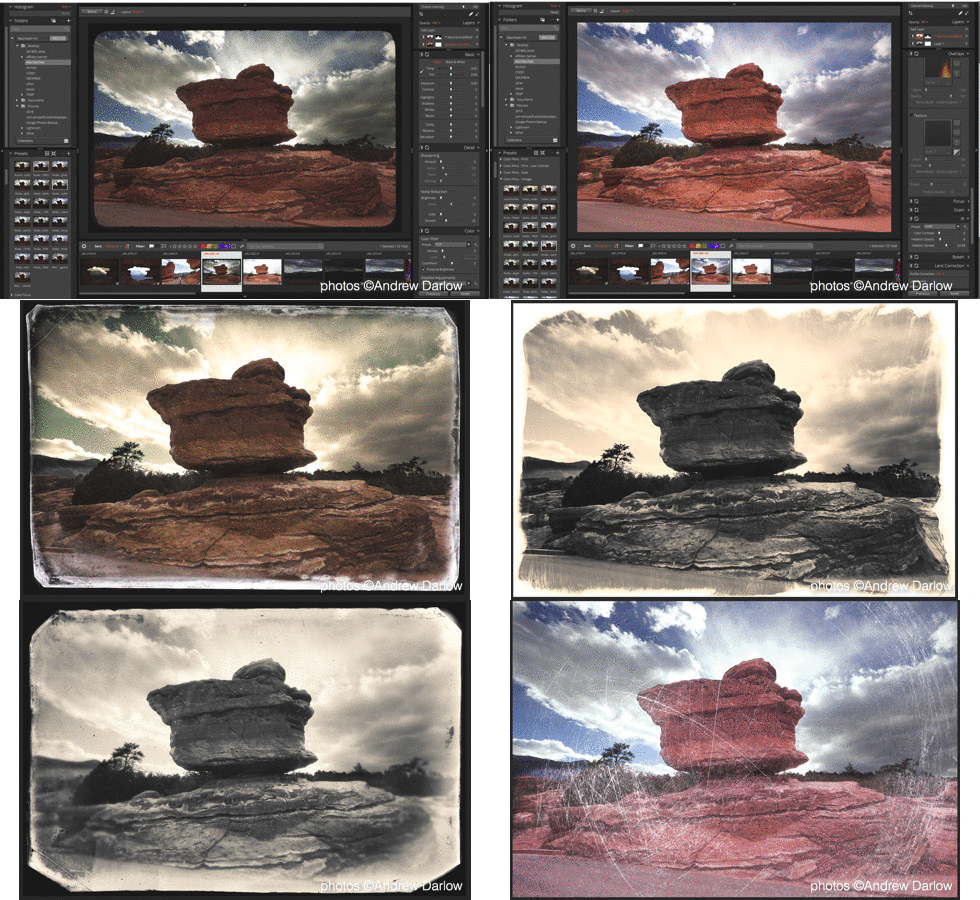
This 18 second slide show shows how my image started out (I chose a version in which the sky was well-exposed, so the rocks and road were too dark). I then created a new layer and a layer mask (the mask is shown in red). I then brightened the rock and road using the tools in the Basic panel. After that, I had fun creating the images you see above. They were extremely easy to make using Exposure X3’s built-in Presets.
• Presets, Presets and more Presets! Did I mention that there are a lot of Presets that come pre-loaded with Exposure X3? They are absolutely fantastic, and greatly increase the value of the software in my opinion. Many Presets emulate the look of black and white and color film types, and I got lost in them for quite a while. I should also note that in addition to exposure, color, etc., Presets can be saved with Exposure X3’s incredible Overlays (see above for more about Overlays). This is heaven for any designer or photographer who loves the look of distressed images like those that have scratches, or the look of platinum-palladium prints that have been created by hand coating papers or other substrates. Once you find a look that you like, you can tweak it and then save it as a Preset.
Another nice touch re: Presets is that each preset’s effect can be tested on a full screen image just by hovering over it. When you want to apply one or more presets to an image, I recommend clicking on the brush icon (located just above the Layers panel) and checking the box under Preset called “on a new layer” so that you can keep adding presets to your layer stack (see screen shot above under “Layers”. That allows you to have multiple Presets on multiple layers. You can turn them on and off, and you can dial the opacity of any of them to reduce the effect. This is similar to having multiple Virtual Copies, but without having to keep track of multiple images inside of the application. I should note that you also have the option of making Virtual Copies if you like.
There is another excellent way to see multiple presets applied to the same image and placed side-by-side (a maximum of 6 different presets can be shown in this way). It’s called Audition mode, and of course, there’s a video tutorial for it (see below) :
• IR Panel This is another fantastic option inside Exposure X3. IR stands for Infrared, and the tool emulates the glow that you often see when using infrared films. It’s ideal for both black and white and color portraits, or for any other photograph or drawing to which you’d like to add a “dream-like” feeling.
• Export Profiles A very nice “added touch” that the developers included in Exposure X3 is a collection of Export Presets for a wide variety of social media and popular photo portfolio sites like Zenfolio and SmugMug. These can be very helpful and save a lot of time and disk space when you need to export your work out to a folder before uploading to one of those services since the resolution and JPEG compression is already set for you (though you can edit the settings and save a new Preset).
Exposure X3 Pricing and 30 Day Free Trial
Alien Skin Exposure X3 is available in two configurations:
• Exposure X3 (US $149), and the
• Exposure X3 Bundle (US $199), which includes Exposure X3, Snap Art, and Blow Up. Blow Up is an incredible application that can enlarge your images quite a bit while retaining good detail and minimal or no visible artifacts. No software that upsizes your images is perfect, but if you give it a good quality image to start with, there’s a very good chance you will be impressed by the results once you dial in your settings. Snap Art is an application that focuses on transforming photos or other artwork in many different ways. For example, you can make a photo look like an oil painting, watercolor, etc. It normally sells for US $99 by itself. For more on Snap Art, visit this page.
If you’d like to try out Alien Skin Exposure X3 for free for 30 days, visit this page.
Exposure X4 Information and Upgrade
Alien Skin Software recently announced that a new version of Exposure named Exposure 4 will be coming soon. The company also announced that it will be sending free copies of Exposure X4 to anyone who purchased Exposure X3 (or the Exposure X3 Bundle) on or after July 1, 2018. If you purchased any version of Exposure before July 1, your current license code qualifies you for an upgrade price of $99.
Here is a list of new and/or updated features that are slated for Exposure X4 (Source: Alien Skin Software’s Blog)
- Improvements to Exposure’s RAW processing system.
- Perspective and keystone correction to minimize or eliminate optical distortion.
- Enhanced light effects that you can move and rotate freely anywhere in your image.
- Smart collections that automatically populate based on photo criteria that you choose.
- Faster file exporting and launch times.
- Lightroom migration tool that brings your Lightroom organizational metadata over into Exposure.
- Monitored folders that support tethered shooting workflows.
- New printing presets.
- Support for new cameras and lenses.
- Expanded workflow options for image copying and exporting.
Conclusion
Overall, I am extremely impressed by Alien Skin Software’s Exposure X3 application and look forward to what’s coming in Exposure X4. I can definitely see people using this application as a replacement for other RAW editors and organizers. Will I be giving up Lightroom? No (at least not for now). I currently still prefer to use Lightroom for the vast majority of my culling, editing, keywording and printing, especially since I’ve been using it for over five years, and my main catalog has over 400,000 images. But I will definitely turn to Exposure X3 when I want to edit images using the application’s powerful Layers panel, or when I want to explore the application’s incredible Preset and Overlay options. I can see a lot of Lightroom users doing the same.
If you’d like to try out Alien Skin Exposure X3 for free for 30 days, visit this page.
——-
(Full Disclosure: Apart from being provided a license code for the Exposure X3 Bundle, I was not compensated in any way for writing this article. I plan to purchase Exposure X4 when it is released, and look forward to sharing my experiences with it. Please note that this article contains affiliate links to the Alien Skin software site, which means that I may be compensated if a purchase is made, but pricing will be the same as if you had navigated directly to Alien Skin Software’s site. If you would prefer not to use my links, just visit your favorite search engine and type in: “Alien Skin Software Exposure X3”
How to Protect Any Camera LCD for about $10
Hello! I’ve recently begun to send out a weekly photo tips newsletter (you can sign up here to start receiving it). One of the recent tips that I shared was: Use Glass LCD Protectors on all of your LCD screens.
This may be one of those “I wish I had done that” tips for you. If you look at all of your camera LCD screens (the part on the back that displays video and/or stills), and if you see any scratches on any of them, you almost definitely could have avoided them by using a thin, self-adhesive glass LCD protector. That being said, I’ve been amazed at how the appearance thin scratches get reduced dramatically when I put an LCD protector on. To find them online, just search on your favorite camera store’s website or other retailer for “Glass Protective Screen Guard,” or “Glass Screen Protector,” or “Glass LCD Screen Protector” and your specific camera name. Cost will be about $5-30 each. I recommend buying two (they often come in packs of two), and try to work in a dust-free location. Also, keep the screen on by pressing the play button before you apply it so that you can more easily align it properly.
I would also remove the lens and place a body cap on the camera so that it’s easier to work on a flat surface. If at first you don’t succeed placing it properly, try, try again! I like to line it up on the left side of the lcd and carefully place it without touching the sticky part. In the video below, the person applying the glass cover shows how you can use the two alignment stickers. It may or may not be helpful on camera LCDs if your glass covers come with the stickers, but it’s worth trying.
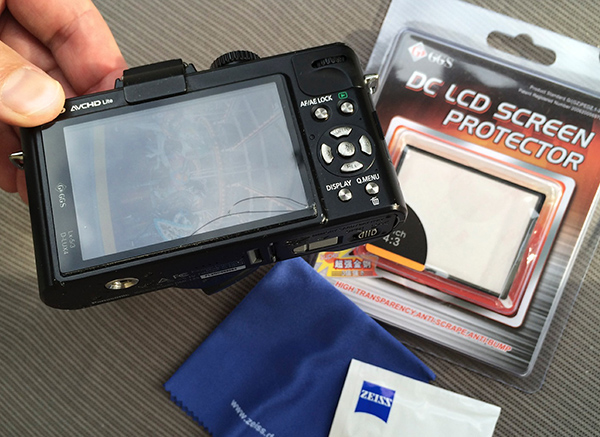
My small Panasonic DMC-LX5 camera was saved thanks to an LCD Glass Protector (shown above after the damage was done). I dropped it at an amusement park onto pavement from about two feet. I’m amazed that the camera survived with just a cracked screen protector, and a small scratch to the metal near the Display button! Of course, if it had fallen a different way, the screen may not have made a difference, but using it might just save your camera one day.
The glass protectors go on like stickers and can be removed without damaging the LCD (I can’t personally guarantee that, but I have never had any problems after using them on my cameras, smartphones and tablets for at least the last five years). And if you want to be a “ninja,” you can measure the entire area of the screen and any additional border, and find a protector that might be for another camera because sometimes the glass covers made for specific cameras will cover most, but not all of the glass on the back of your camera.
Here’s a good video that shows how to install a glass screen protector on a Smartphone. I highly recommend using these on smartphones, especially since most people don’t have a neck strap or other type of strap connected to their smart phone.
UPCOMING LIGHTROOM WORKSHOP
I’m really looking forward to returning to the NJ Media Center in Berkeley Heights, NJ to teach this workshop on Lightroom workflow and editing:
Mastering Lightroom Workflow: From File Organization to Effortless Manipulations w/ Andrew Darlow
Date: Sun. 6/24/2018
Lightroom Classic CC offers many powerful features, but without a good foundation and understanding of its tools, it’s easy to get frustrated. In this full day lecture and hands-on workshop, I will focus on helping you get the most from your images from start to finish.
Here’s what one participant had to say about the workshop: “I’m a full-frame DSLR camera user and I have a considerable amount of experience with Photoshop. However, I didn’t know how to organize my photographs properly, and I was getting frustrated trying to edit my photos inside of Lightroom. The full-day workshop had a lot of information, but it was very well presented, in an easy to follow way. Andrew is extremely professional and he managed a very diverse group, keeping everyone happy and on-course, which is not easy. I picked up a lot of editing tips and shortcuts that would have been much more time consuming for me to research online on my own.” – Branch Watkins

