Alien Skin Software Exposure X4 and X4.5 Overview and Link to Free Trial

It’s truly an amazing time to be a photographer. There is no shortage of incredible tools to edit just about any scanned or digitally-captured image, whether it be a Raw file or many other file types. In September of 2018 I posted an overview of Alien Skin Exposure X3 as well as some of the new features that were coming to Exposure X4. You can find that article here. Recently, the company released Exposure X4.

I was impressed then with the speed and feature set of Exposure X3, and I’m even more impressed now with Exposure X4.5. There are many effects in the application/plug-in that just can’t be found on other non-destructive image editors.

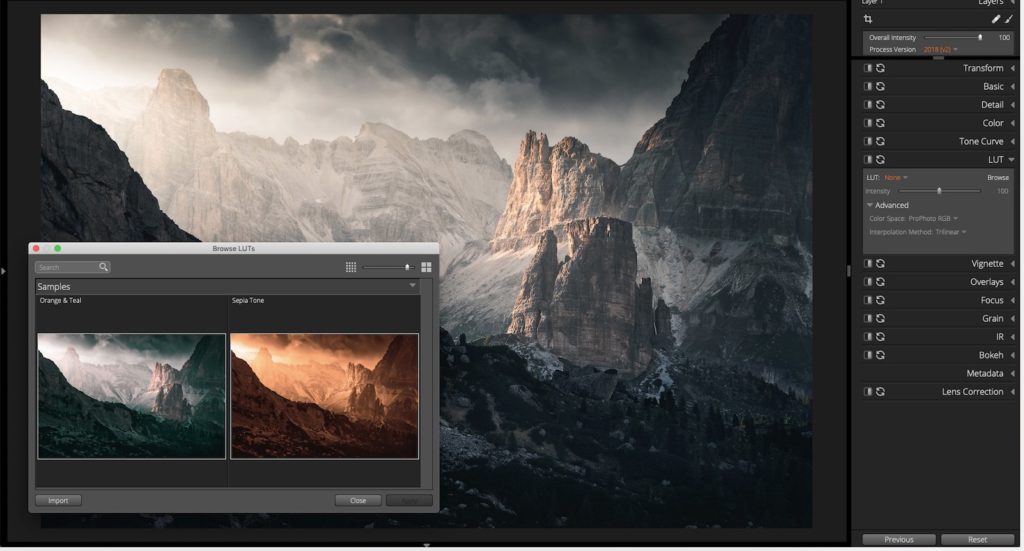
A screenshot showing an image with two LUT (Look up Table) options. LUTs are a new feature in Exposure X4.5. Image courtesy Alien Skin Software

Some of the things that stand out for me in Exposure X4 and X4.5 are as follows:

LUTs: (short for Look-Up Tables) are small files that allow you to apply certain “looks” or color grading non-destructively to your images inside of Exposure X4. This is an excellent article on the topic that shows a number of examples, with a link to some free downloadable LUTs from Lutify.me.

Preset thumbnails: (allow you to see and apply many different effects, such as film simulations), are able to be resized by dragging the panel where they are located. This is extremely helpful when choosing different looks. Like all of the panels, you can even customize where they are located.

Hovering effect for presets is very fast (I tested it on a 2013 MacBook Pro with an i7 Processor). This feature allows you to hover your mouse over a preset, and the image in the center window will temporarily apply that preset, making it very fast and easy to test out different looks.

The “IR” tools are nothing short of amazing. This tool allows you to create different types of “glow effects” that simulate the look of infrared (or you can use them to just add a softer look) in your images. As they say, you have to see it to believe it!

The Bokeh tool (used to create creative blur effects) could be an application all by itself. It’s just mind-blowing.

• Tethered Shooting and Non-destructive Layers: Here is a link to a tutorial that shows some of what Exposure X4.5 can do, especially when put in the hands of a skilled image maker:

User Configurable Keyboard Shortcuts, including one option that makes it easier for Lightroom users to either use Exposure X4.5 as an additional editing tool (standalone or as a plug-in), or for those who want to make the transition from Lightroom Classic to Alien Skin Exposure X4.5.

And here are a few of the newest features that have been added to Exposure X4.5 (from the company’s press materials)

  • LUT (Look up Table) Support;
  • Additional freely moveable light leak overlays, including the new categories of Lens Flare and Haze;
  • Collection membership now appears the Metadata panel, enabling photographers to see a full list of the collections a photo belongs to
  • Support for additional cameras and lenses from a number of manufacturers:
    • Fujifilm
    • Leica
    • Panasonic
    • Nikon
    • Sony
    • Olympus
    • Canon
    • DJI
  • User-requested workflow refinements that include new photo sizing options when exporting, new keyboard shortcuts;
  • Configurable keyboard shortcuts (I also mentioned this above, but here’s a link to an excellent overview of the feature); and
  • Copy Photos from Card tool adds visual browsing and selection of files to be copied.

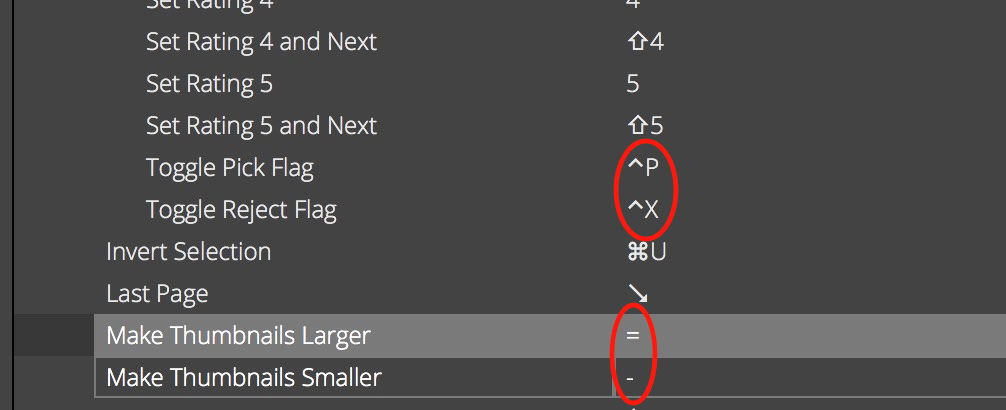
MODIFYING KEYBOARD SHORTCUTS – A Real World Example

I try to use keyboard shortcuts whenever possible to save time, and two that I constantly use in Lightroom are the “-” and “=” keys to make thumbnails larger or smaller in the Library Module. With that in mind, I was able to change the default keyboard shortcut in Exposure X4.5 for those keys (they were previously assigned to “Toggle Pick Flag” and “Toggle Reject Flag”. Now the keyboard shortcuts match between both applications.

NEW VISUAL BROWSING OPTION FOR CARD IMPORTS

I found the new visual browsing option when copying photos from a card to be very well designed and easy to use. The thumbnails can be made quite large (almost full screen if you like), which is great for quickly making selections. Here’s what it looks like (click on image to see it larger):

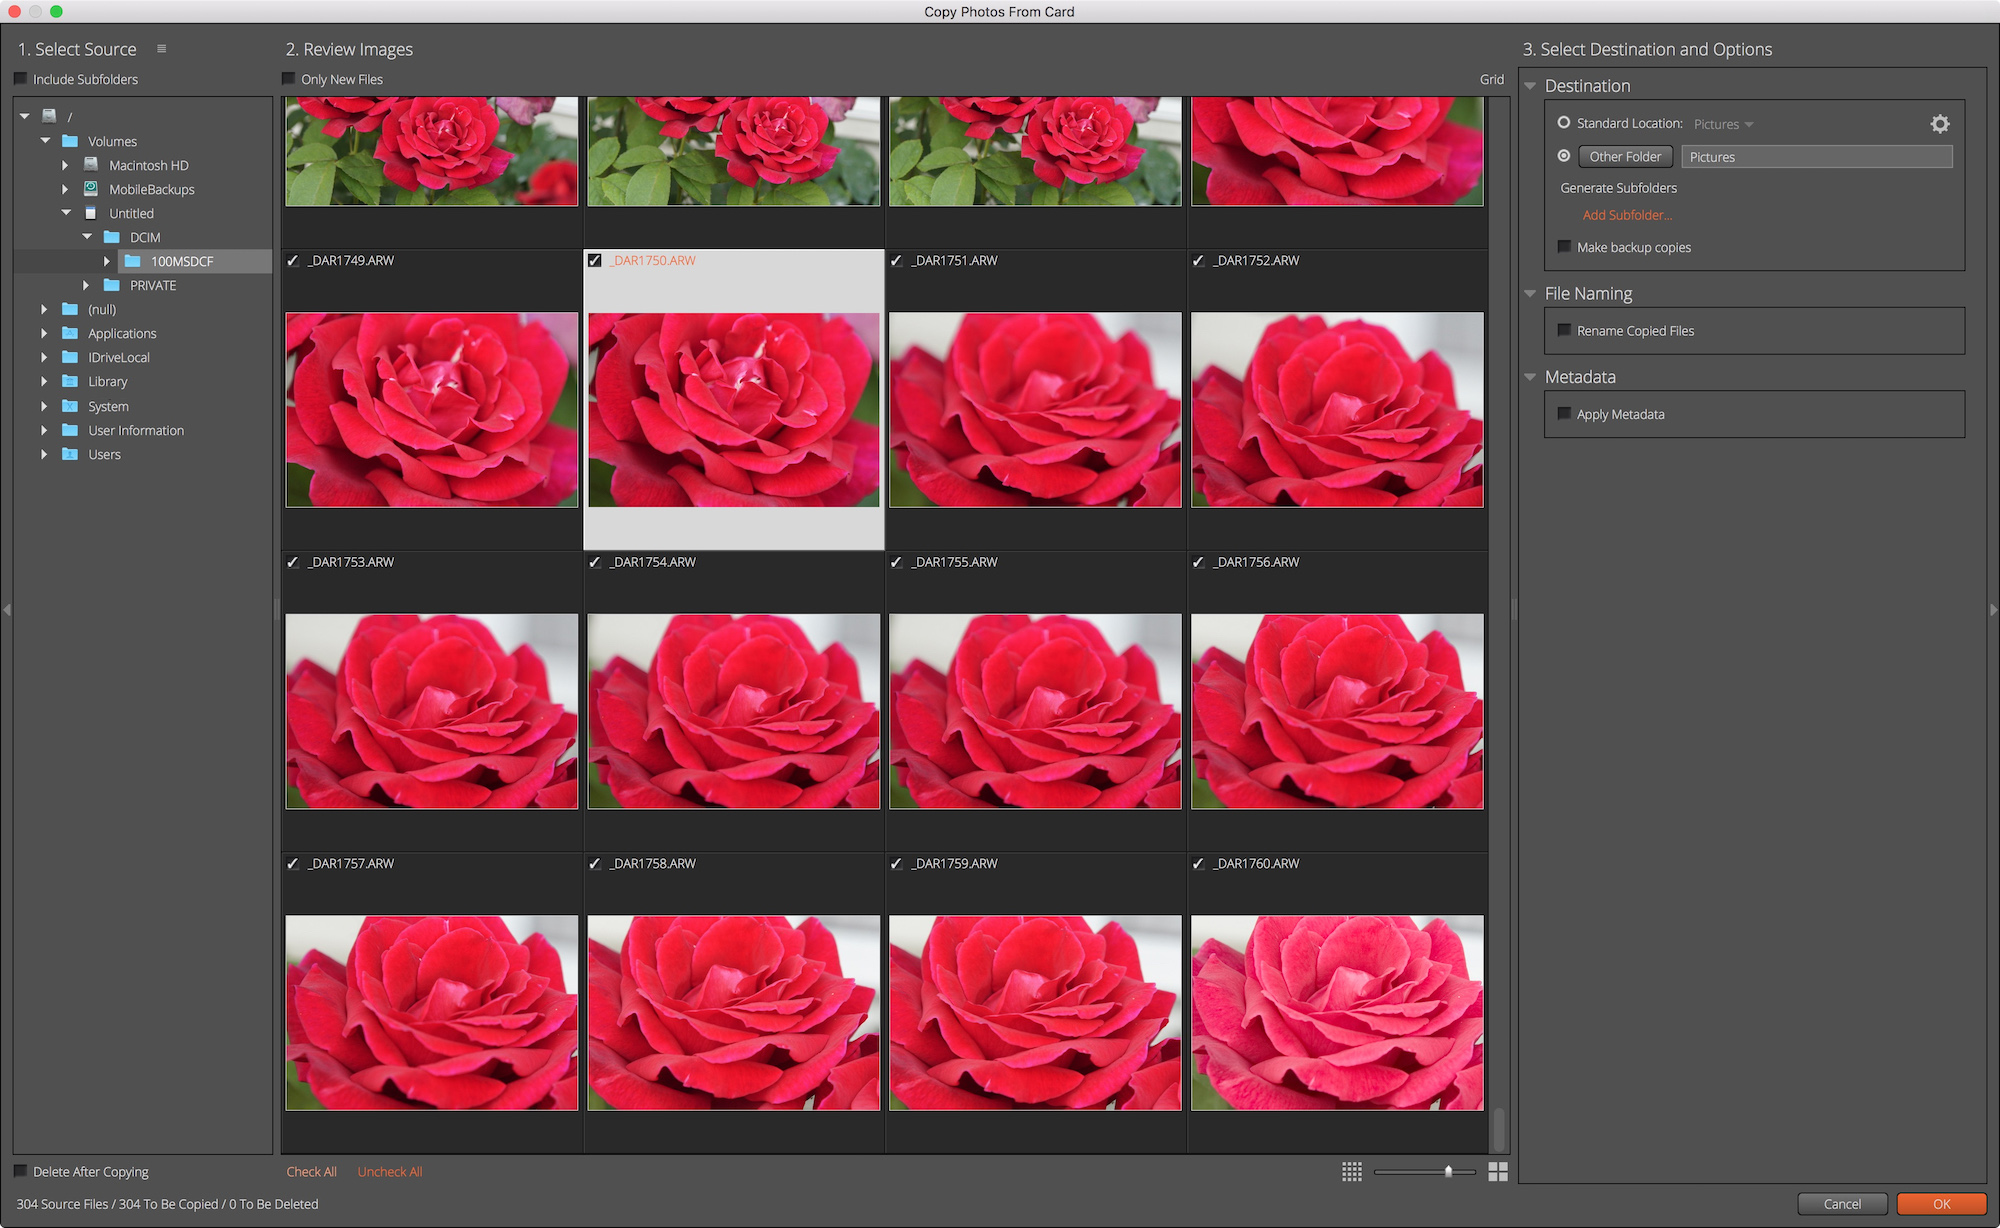
The card import dialog box in Alien Skin Exposure X4.5

TUTORIALS

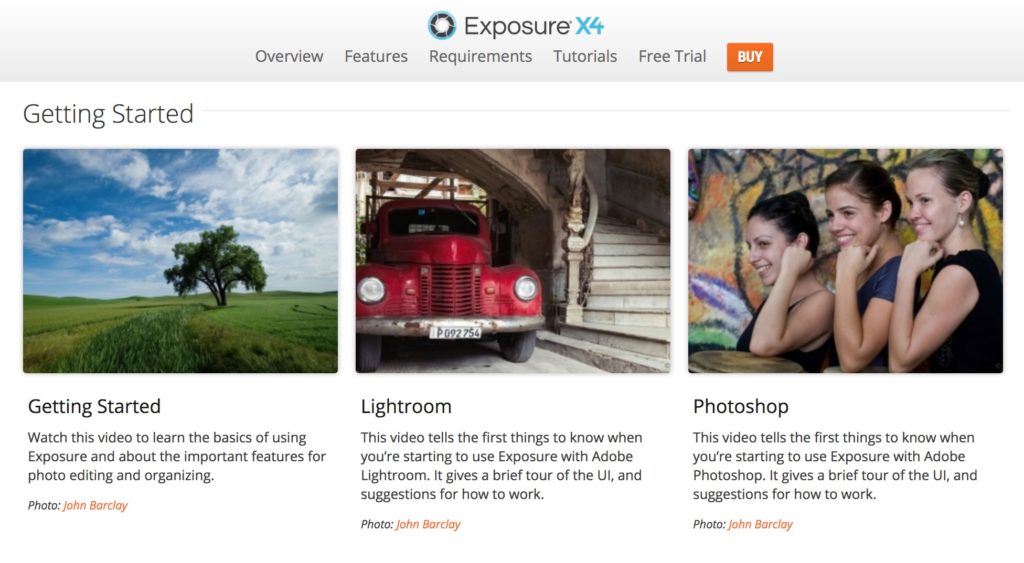
A screenshot from the tutorials page for Exposure X4.5

Alien Skin Software has an excellent collection of tutorials to help anyone get started or hone their skills with their applications. Here is a link to the tutorial page for Exposure X4.5, and here is a link to their YouTube channel.

I would be remiss not to include at at least one screen shot from my testing. I praised this feature in my review of Alien Skin Exposure X3, but this tool never ceases to amaze me. It’s the Overlays panel, and if you like the idea of being able to create a wide variety of custom borders for your images, I would reserve a few hours for yourself to dig in and enjoy!

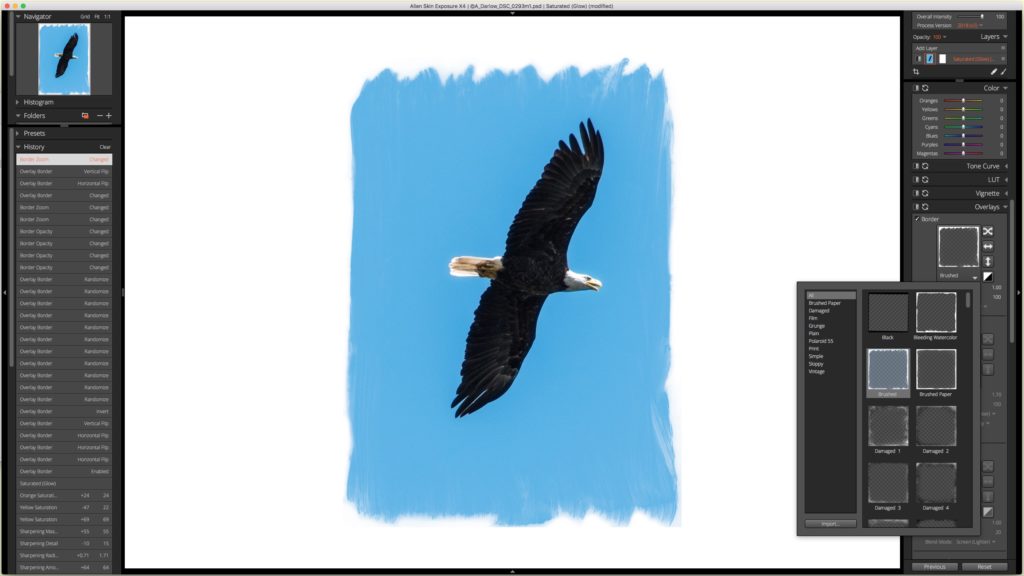
One of my photos being edited in the Overlays panel. Photo © Andrew Darlow

EXPOSURE X4.5 PRICING and 30 DAY FREE TRIAL

Alien Skin Exposure X4.5 is free to all owners of Exposure X4, and is available in two configurations for Mac and Windows OS:

Exposure X4 (US $119). I should note that this is a $30 savings compared with the previous price of Exposure X3.

• Exposure X4 Bundle (US $149), a $50 savings compared with the previous Exposure X3 bundle. It includes Exposure X4, Snap Art, and Blow Up. As I noted in my other article, Blow Up is an amazing application that can enlarge your images quite a bit while retaining good detail and minimal or no visible artifacts. Snap Art’s forte is transforming photos or other artwork in many different ways. Effects include many different looks, including pastel, oil painting and watercolor. For more on Snap Art, visit this page, or see the the video below:

and here is a quick video overview of Exposure X4:

Re: upgrades, the cost to upgrade from previous versions of Exposure to Exposure X4.5 is $79. The company also frequently releases updates to support the raw files of new cameras, make bug fixes, etc.

I highly recommend downloading a copy of Alien Skin Exposure X4.5 and giving it a test drive. Even if you are happy with your current Raw processing app or other image editor, you may find that some of the tools are well worth the cost of the application. If you’d like to try out  Exposure X4.5 for free for 30 days, visit this page.

Hands-on Review of Twindom’s 3D “Cloning” Service – My Experience Being Scanned and Turned into a Figurine

There’s no denying that many people love figurines, action figures, etc., whether they are used for play acting or to just keep on a shelf or display cabinet. One of the most interesting companies whose booth I visited at PhotoPlus Expo 2018 in New York City was Twindom. They make Full Body 3D Scanners that can capture images in about a quarter of a second in a high-tech photo booth. Those scans can then be used to create 3D figurines. The samples they showed were AMAZING, and I decided to have a scan done at the show with my good friend Ron Wyatt. We are usually on the other side of the camera, but this was too much fun not to try! Below is a photo that I took of the final product, which is a seven inch figurine.

My overall impression of it is WOW! I’ve seen a lot of action figures over the years, and even with millions of dollars of equipment at their disposal, they usually fall short (in a big way) in representing the action hero or superhero’s facial features. In the sample they sent to me, it definitely looked like me and my friend to my eyes, and the truly amazing part is the color accuracy and how the folds of the clothing are rendered. If I were to describe the texture of the figurine, it would be like that of sandstone.

Important note: I was curious how many people and/or pets can be captured in one 3D full-body scan using the system, and I received some information from Twindom, which may or may not be 100% applicable depending upon where and when you have your scan done. If you have a small dog, cat, baby or small child that’s being held in someone’s arms, then you can still have four people in addition to the baby or pet. If there are already four people in the scan, a pet on a leash might still be able to fit in the scanning area, and there may be an extra charge for the touch-up and additional material that would be used for the figurine. Just to be sure, I would ask about the number of people and/or pets that can be in the scan before going to the location to have a scan done.

If I have anything negative to say about the final “print” as they call it, it’s that there are some faint vertical lines going through my shirt and some other areas, which is something that can happen with the printing process. That being said, at least in my case, the lines look as though they could have been a part of the design of my shirt, and under typical room lighting, they almost disappear. In other areas where I can see faint lines, they are extremely faint and I can’t see them at all under most typical lighting. I took the “selfie” photo above in strong afternoon daylight to show as much of the detail as possible.

FIGURINE OPTIONS

Please note: As mentioned below, I would consider the prices shown here to be “list prices,” because I’ve seen a range of different prices for all sizes depending on where and when you have the scans done and where you order figurines.

Twindom also offers its clients (those who purchase their scanning system and provide the scanning service) the ability to order the figurines for their clients (the end customer) with a number of different options. People can also be sent a link to order figurines themselves, but I’m not sure if all providers allow this option. A few of the options I noticed when checking the ordering page shown below include:

•  Ability to choose a figurine size from 3-14 inches.

• Ability to have your figurine placed on a white base. I would highly recommend this for most people because the figurines can fall over fairly easily without a base. This adds about $15-30 to the overall cost depending on the size of the figurine, but I noticed that at least one company includes this in their pricing for some sizes.

• Ability to choose TwinProtect™ coating, which gives the figurine a semi-gloss finish and also protects it more than if it had no coating. The coating adds about $20-30 to the overall cost depending on the size of the figurine, but like the base, I noticed that at least one company includes this in their pricing for some sizes.

• Ability to choose between a crystal and 3D print. If you’ve visited a mall in the last five years, you’ve probably seen images embedded inside of crystal.

• Ability to choose from full body, half-body or bust (some companies may not offer that option).

With a base added, the 7 inch figurine that Twindom created for me and that’s pictured above would cost about $259. I think the smallest size (3 inches) could work well as a wedding cake topper (though 6-7 inch figurines would make more of a statement). A three-inch figurine would cost $109-$130 depending on the options you choose. I would consider the prices I just mentioned “list prices,” because I’ve seen a range of different prices for all sizes depending on where and when you have the scans done and figurines made.

WHERE TO HAVE YOURSELF “CLONED”

If you’d like to have a scan done of you and/or your loved one (I think pets are ideal subjects for this), there are some pop-up installations at Bloomingdale’s stores in New York City and San Francisco this holiday season (until 12/30/2018). You can find the addresses for the stores and a link to book an appointment here. I would not recommend just showing up to make an appointment, but you can always call the store and ask what’s best. There are a number of other locations around the world. Here are a few in the United States that the company shared with me:

Holodeck 3D – Washington State
PeoplePrints3D – Pennsylvania
Mini Me Factory – Georgia

And here is a company in Japan who offers the service. Their site has a lot of photos of different figurines that show how the technology is being used.

Here’s a video overview of the scanning and printing process:

I found Twindom’s website to be very informative for those who are interested in finding out how to set up a 3D photo studio. According to their website, the cost of a system is US$29,995, plus a $299/month Cloud Subscription. That’s certainly not inexpensive, but I think it’s a very interesting business opportunity.

This technology seems to me like it would be a great option for artists to create limited edition pieces for sale (it’s probably being done already!). It reminds me a bit of the Polaroid 20×24 camera system because you can’t just take a photo with any camera and send out for prints. Here’s a great video about the 20×24 Polaroid process in case you are curious.

Overall, based on my hands-on experience, I highly recommend the Twindom scanning and printing process. Please let me know if you have a scan done. I’d love to see a photo of you in 3D!

Full disclosure: Twindom sent the figurine pictured above to me so that I could write this review. I received no other compensation for this review.

Luminar 3 with Libraries Overview and Special Offer

There is no shortage of Raw photo processing software that can be used to convert your images from Raw to many other formats (TIFF, PSD, JPG, etc.). Examples include Adobe Lightroom, Alien Skin Exposure X4 and Phase One Capture One Pro 12. Most photo processors also have powerful editing capabilities. And one thing I should note is that even if you don’t take photos using the Raw format that your camera may offer as an option, these programs work very well with other formats (even JPGs from smartphones). At their core, most of these programs are what’s known as “non-destructive editors,” which means that no matter what adjustments you make inside the software, you can easily get back to the original version of your images if you like, instead of having to make multiple copies before you begin editing. Lightroom has been my “go-to” application for years, but I’m always interested in seeing what else is out there.

That brings me to an impressive Raw photo processing application called Luminar 3 with Libraries. For the first time, the folks at Skylum have added a Library-based workflow to their application. I recently saw a live demo of the software, and I was very impressed by the speed at which viewing and editing can be done. I also like how easy they make seeing “before and after” effects with the slide of a bar across the screen. They also have some “AI” features and a sky enhancer that can dramatically improve the look of photos very quickly.

Currently, the DAM (Digital Asset Management) and other tools are not nearly as robust as in Lightroom (for example, there is no keyword support and no ability to create virtual copies). However, the folks at Skylum have been working to implement many more features, and to get an idea about what’s in store for the application in 2019 (which includes keywords and virtual copies), visit this page to see their planned roadmap.

I think that the video below by Trey Ratcliff can help you to get a good feel for how Luminar 3 with Libraries is different from other editors, and what its like working with the new Libraries features inside of the application:

For now, I personally will mostly be using Luminar 3 with Libraries to do edits that I feel can be done better (or much faster) than what I can do in Lightroom or another application. Or, I may process specific projects through the application so that I can quickly rate and edit a large number of images. For files that I would like to then manage in Lightroom, I will export my files from Luminar 3 with Libraries to a folder and then import them into Lightroom. If you keep your files managed with a non-destructive editor like Luminar 3 with Libraries or Lightroom, there’s no need to export your files until you need them for another purpose, like sending them to a photo lab for printing.

PRICING, AVAILABILITY AND A SPECIAL OFFER

Pricing for Luminar 3 with Libraries is currently $59 (normally $69). Also, you can save an additional $10 with promo code: IMAGINGBUFFET (look for the link to “Enter Promotional Code” at checkout). Also, unlike many other software companies’ licenses, one license covers 5 Macs or PCs (check their terms for specific details). Satisfaction is also guaranteed, with a 45 Day money back policy. If you currently own Luminar 2018, you are able to upgrade to Luminar 3 with Libraries for no fee. Also check the website for other possible discount offers if you own other products from Skylum Software.

Also, when you purchase Luminar 3 with Libraries by 12/19/2018 at 5AM PST, you will receive all of the bonuses listed below (if you are thinking of taking a trip to Iceland and like the tours offered by Iceland Photo Tours, that bonus alone is very attractive):

For more information and to claim this very special offer, visit THIS PAGE.

I also have two more “Holiday Specials” to share:

1. The folks over at PhotoshopCAFE have a 15% coupon on everything in their store for at least the next four days (the promo code is 5days2018). To see all of the amazing video training they offer, visit this page. I just purchased their Making Movies in Photoshop Video Training. You can find that title HERE.

2. A few years ago, I created a GoFundMe page for my son Tyler’s intensive Autism treatment in Massachusetts. The results have been fantastic (what we learned we use every day, and Tyler has made great progress). As part of the rewards that were offered, two were consulting packages with me so that I can help others with their workflow, camera setup, custom printer profiles, printing (on their own printer or by using an outside service). I’ve decided to make those two packages available again for a limited time (until 12/31/2018). You will be saving $219 off my standard 6 hr rate ($975 for 6 hrs), and $255 off my standard 10 hr rate ($1,495 for 10 hrs). When I sent the offer to my newsletter subscribers, I was asked if I would create a special offer for consulting sessions under six hours, so I am now also offering a two-hour laser-focused session for just $350 (each additional hour is just $162.50; the same as the hourly rate of my 6-hr special consulting special).

To see if we are a good fit for each other, just reserve a no obligation 15 minute Strategy Session with me HERE, and if we decide that we’d like to work together, you can then choose from either consulting option. I’m also happy to create gift certificates for any of my consulting packages (they are 100% refundable if the person who you give the consulting to decides it’s not right for them after we speak for about 15 minutes).

That’s it for now! I wish you and yours a wonderful Holiday Season, and please don’t forget to back up your precious photos and videos.

All the best,

-Andrew

(Full disclosure: I have an affiliate relationship with Skylum Software (makers of Luminar 3 with Libraries), so I will receive a commission if you use my promo code or links above. However, your pricing before any promotional discounts is the same as if you visit their website directly. I have no affiliate relationship with any of the other companies listed above).

1 3 4 5 6 7 132