
3
Adobe Creative Suite 5 Launch Streaming Live 4/12/2010 at 11am EST
I thought I’d send out a quick announcement that the Adobe CS5 Product Family launches today, Monday 4/12/2010. A streaming webcast launch begins at 8am PST (11am EST), and requires a free registration, which you can find a link to here. When you register, you’ll see some “sneak peek” videos of what’s inside (screen shot below). These and other sneak peek videos are also available here.

I’m looking forward to trying out Content-Aware Fill in Photoshop CS5, primarily for quickly extending backgrounds. It’s very common for me to have to extend a background to create a more panoramic look, or just to add some background to achieve a 4×6 ratio for a client who wants pictures in that very popular size.
Below are direct links to the ten Creative Suite 5 press releases with the headlines of each one linked to the release on Adobe.com (I think that reading the releases is one of the best ways to see some of the highlights of what’s inside each Creative Suite bundle).
1. Adobe Unveils Creative Suite 5 Product Family
2. Adobe Delivers Creative Suite 5 Design Premium
3. Adobe Announces Creative Suite 5 Web Premium
4. Adobe Debuts Creative Suite 5 Production Premium
5. Adobe Launches Photoshop CS5 and Photoshop CS5 Extended
6. InDesign CS5 Powers the Transition to Digital Publishing
7. Adobe Releases Illustrator CS5
8. Adobe Introduces Flash Catalyst CS5
9. Adobe Premiere Pro CS5 Redefines Nonlinear Editing
10. Adobe Helps Prepare the 21st Century Workforce with Creative Suite 5
For a great 45 minute overview of Photoshop by Terry White of Adobe, including a look at the new “mini Bridge,” which is an embedded version of Bridge available as a panel inside Photoshop CS5 and CS5 Extended), and a new Edge Detection tool for selecting challenging images (it looks especially good for hair), click here.
And for a directory of videos covering CS5 applications, visit this page on AdobeTV.com.
2
Recent Tips and Art Resources Column (plus archives) on RedDogJournal.com
I recently wrote another column at RedDogJournal.com that I thought might be of interest. I generally write a column for their site every other week. In it I often offer printing tips and techniques, and other areas I highlight include: photo-related events; learning resources; exhibitions; talks and photo contests. For example, a tip from my most recent column is titled: Quick Printing Tip: How to Place Images Perfectly Every Time.

The most recent column can be found here:
https://reddogjournal.com/darlow-27.php
Also, by changing the number above from 27 to a lower number (1 to 26) like this:
https://reddogjournal.com/darlow-26.php you can find all 27 of the columns I’ve written over the last year and a half.
And if you’d like to receive the newsletter portion related to fine-art photography (those news items are not available at this time online-only through the newsletter), you can sign up here for free (I highly recommend it):
https://reddogjournal.com/join.php
5
Creative Blur Step by Step Photoshop Tutorial
Creative Blur Photoshop Tutorial (Works in all versions of Photoshop since Photoshop CS4)
Images and Text by Andrew Darlow
Creative Blur has been used from the very early days of photography both intentionally to create a certain look, and because of the inherent characteristics of lenses, apertures and cameras with swings and tilts, such as 4×5 and 8×10 view cameras.
Today we have many options for using blur creatively in-camera and in post production. A popular and innovative family of lenses called Lensbabies allows for creative blur in-camera without the need for any software. And a software application/plug-in from Alien Skin Software called Exposure (see my hands-on review HERE) has a tool called “Bokeh” that allows you to take creative blur to a whole new level.
In this tutorial, I’ll show you how you can quickly and easily transform the look of a photo or illustration in Photoshop by introducing blur on various sections of the image. Photoshop CS4 are recommended, but you can use other blur tools and other applications to create similar effects.
STEP 1: Open your image and duplicate the Background Layer by dragging the background layer onto the copy layer icon at the bottom of the Layer palette, or by selecting the Background layer and choosing Layer>Duplicate Layer> then name the layer.
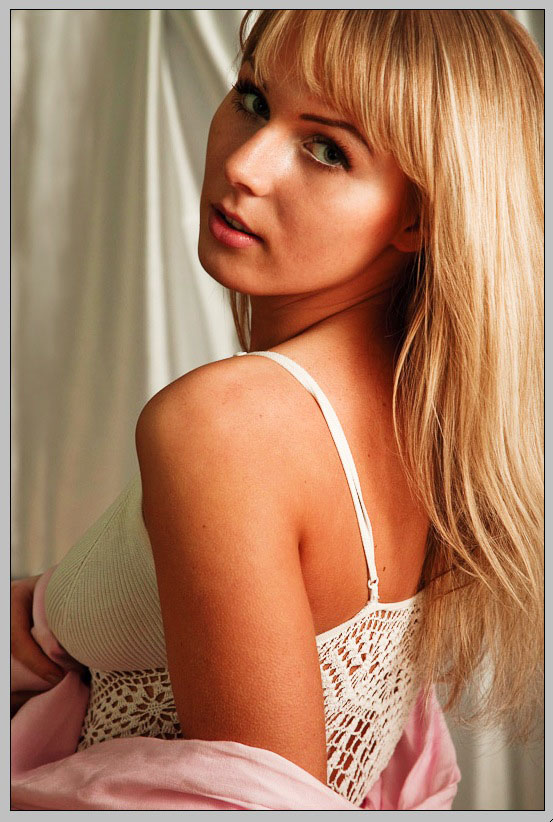
Fig. 1: Original Photo, which has been moderately sharpened overall (photo © Andrew Darlow)
STEP 2: Select the Background copy layer. It’s a good idea to rename it to something like “Blur Layer”. Then apply a blur over the entire image using Filter>Blur>Lens Blur. There are many variables and options available in this tool. I used the options shown in Fig 2.
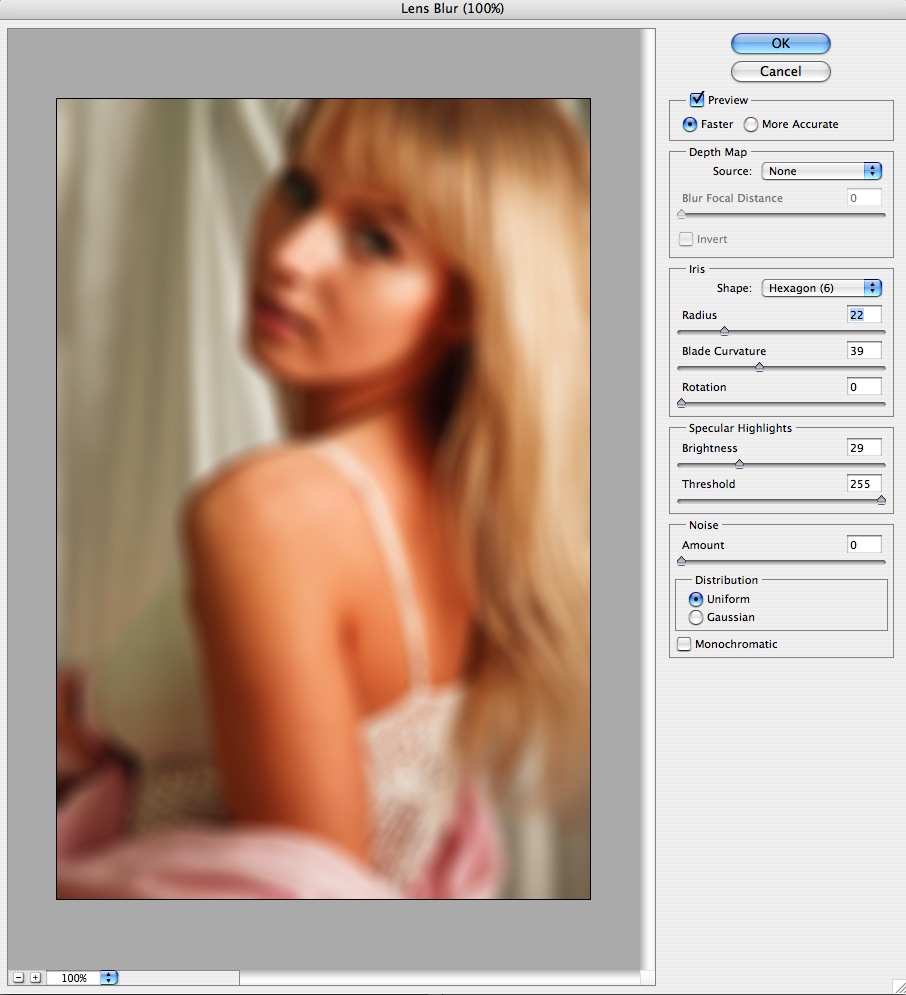
Fig. 2: Lens Blur tool in action (photo © Andrew Darlow)
STEP 3: While the top Layer is selected, create a Layer mask by Option (PC: Alt) Clicking on the Layer Mask icon (Fig. 3). That will conceal the blur and allow you to paint it in selectively.
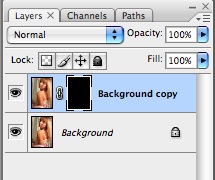
Fig. 3: Duplicated layer with Layer mask
STEP 4: Select the Layer Mask icon and choose a shade of gray or pure white depending on the strength of the blur that you’d like. Then paint in the shade of white or gray you choose using a soft brush. About 100-300 pixels in size and 0 hardness works well for medium-resolution images (about 8-10 megapixel camera images, or 24-30MB in 8-bit RGB, which is 48-60MB in 16-bit RGB). Experiment to determine the best brush size for your images. I like to use the bracket keys “[ ]” to make the brush size larger and smaller as I work because it is fast. The mask that I created and edited can be seen in Fig 4.
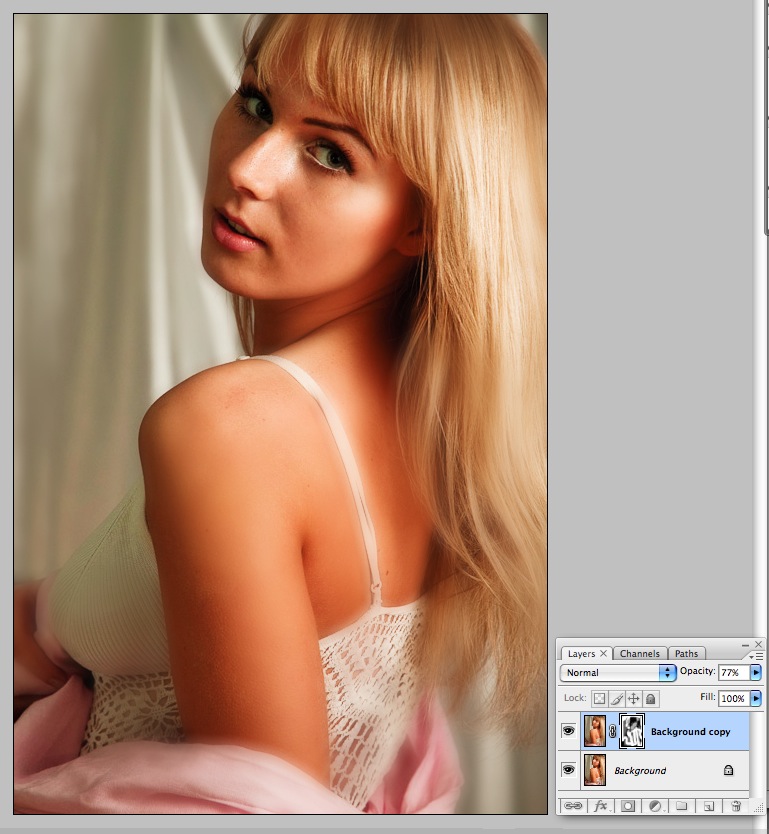
Fig 4: The painted layer mask can be seen in the top of the layers palette, and the final image is shown to the left. (photo © Andrew Darlow)
STEP 5: Examine your work and switch to black in your color picker to paint back sharpness, or switch to another shade to make the blur effect stronger or weaker in any area of your image.