Overview of Connect 2010, the Palm Springs Photo Festival – Happening 3/28 – 4/2, 2010
A few days ago, an update from the Palm Springs Photo Festival 2010 Celebration Program was sent to me. This looks to be an incredible event for advanced amateur and professional photographers, as well as students interested in photography. It will be held from March 28 – April 2, 2010 at Hyatt Regency Suites, Korakia Pensione and The Palm Springs Art Museum, Palm Springs, California.
There is a lot planned during the event, including the following workshops from these noted photographers:
The Joel Meyerowitz Master Class: The Search for Artistic Identity
Kenro Izu: The Sacred Landscape
Lynn Johnson: The Documentary Personal Project
Douglas Kirkland: Portraiture Using the 8×10 Camera
Ed Kashi: Visual Storytelling in the Digital Age
Jack Dykinga: Light in the Desert Landscape
Jock Sturges: The Fine Art Nude
Keith Carter: Personal Style – Finding Your Voice
Frank Ockenfels III: The Signature Style Portrait
Antonin Kratochvil: The Psychological Portrait
Linda Connor: The Importance of Sequencing Your Work
Vincent LaForet: The Convergence Factor: Using the Canon 5-D Mark II for Motion
Nels Israelson: Dramatic Lighting for Dramatic Portraiture
Juergen Nogai: The Art of Architecture Photography
Allegra Wilde: Deconstructing Your Portfolio
Laurie Kratochvil and Carol LeFlufy: The Business of Photography
Below is information about the workshops from the organizers: Our Fifth Year Workshop Program offers intense, remarkable classes with world-renowned working photographers and educators. Most are three full days plus a 4th day morning session and begin on March 29. You will spend three and a half days with your fellow students listening, learning, shooting and comparing notes. Your instructor will work with you, demonstrate his or her methods, explore his or her own work and your own. We also offer one day workshops beginning later in the week, allowing you to choose from special lighting and portfolio organization and presentation classes in addition to your principal workshop, seminars and portfolio reviews.
A listing of the seminars being offered is below:
Recent Tips and Art Resources Column (plus archives) on RedDogJournal.com
I recently wrote another column at RedDogJournal.com that I thought might be of interest. I generally write a column for their site every other week. In it I often offer printing tips and techniques, and other areas I highlight include: photo-related events; learning resources; exhibitions; talks and photo contests. For example, a tip from my most recent column is titled: Quick Printing Tip: How to Place Images Perfectly Every Time.
The most recent column can be found here:
https://reddogjournal.com/darlow-27.php
Also, by changing the number above from 27 to a lower number (1 to 26) like this:
https://reddogjournal.com/darlow-26.php you can find all 27 of the columns I’ve written over the last year and a half.
And if you’d like to receive the newsletter portion related to fine-art photography (those news items are not available at this time online-only through the newsletter), you can sign up here for free (I highly recommend it):
https://reddogjournal.com/join.php
Creative Blur Step by Step Photoshop Tutorial
Creative Blur Photoshop Tutorial (Works in all versions of Photoshop since Photoshop CS4)
Images and Text by Andrew Darlow
Creative Blur has been used from the very early days of photography both intentionally to create a certain look, and because of the inherent characteristics of lenses, apertures and cameras with swings and tilts, such as 4×5 and 8×10 view cameras.
Today we have many options for using blur creatively in-camera and in post production. A popular and innovative family of lenses called Lensbabies allows for creative blur in-camera without the need for any software. And a software application/plug-in from Alien Skin Software called Exposure (see my hands-on review HERE) has a tool called “Bokeh” that allows you to take creative blur to a whole new level.
In this tutorial, I’ll show you how you can quickly and easily transform the look of a photo or illustration in Photoshop by introducing blur on various sections of the image. Photoshop CS4 are recommended, but you can use other blur tools and other applications to create similar effects.
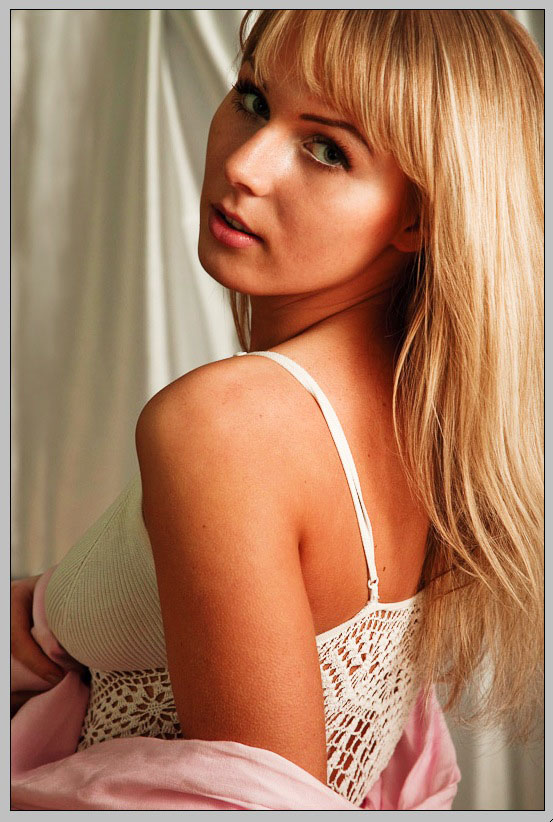
STEP 1: Open your image and duplicate the Background Layer by dragging the background layer onto the copy layer icon at the bottom of the Layer palette, or by selecting the Background layer and choosing Layer>Duplicate Layer> then name the layer.
Fig. 1: Original Photo, which has been moderately sharpened overall (photo © Andrew Darlow)

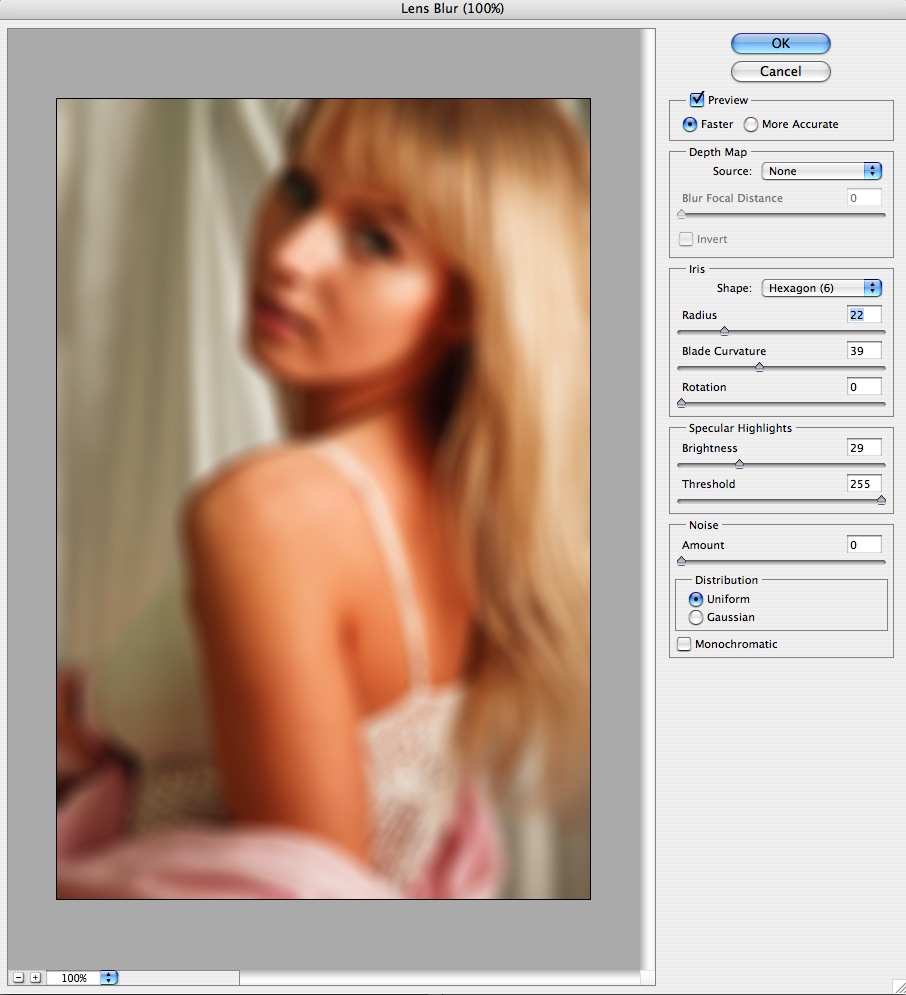
STEP 2: Select the Background copy layer. It’s a good idea to rename it to something like “Blur Layer”. Then apply a blur over the entire image using Filter>Blur>Lens Blur. There are many variables and options available in this tool. I used the options shown in Fig 2.

Fig. 2: Lens Blur tool in action (photo © Andrew Darlow)
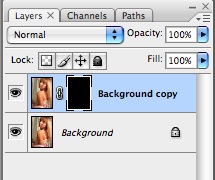
STEP 3: While the top Layer is selected, create a Layer mask by Option (PC: Alt) Clicking on the Layer Mask icon (Fig. 3). That will conceal the blur and allow you to paint it in selectively.

Fig. 3: Duplicated layer with Layer mask
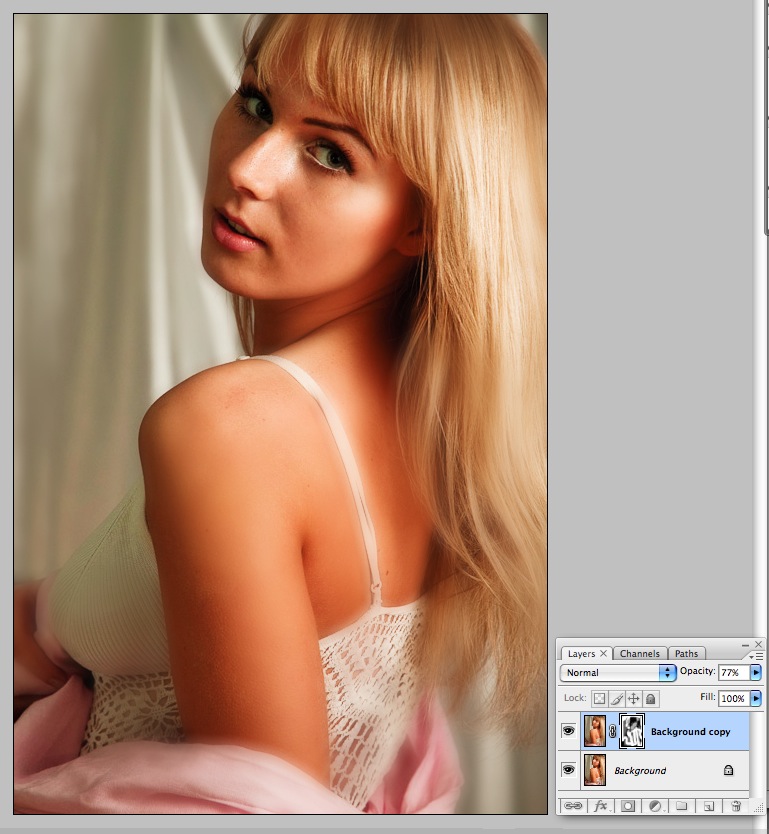
STEP 4: Select the Layer Mask icon and choose a shade of gray or pure white depending on the strength of the blur that you’d like. Then paint in the shade of white or gray you choose using a soft brush. About 100-300 pixels in size and 0 hardness works well for medium-resolution images (about 8-10 megapixel camera images, or 24-30MB in 8-bit RGB, which is 48-60MB in 16-bit RGB). Experiment to determine the best brush size for your images. I like to use the bracket keys “[ ]” to make the brush size larger and smaller as I work because it is fast. The mask that I created and edited can be seen in Fig 4.

Fig 4: The painted layer mask can be seen in the top of the layers palette, and the final image is shown to the left. (photo © Andrew Darlow)
STEP 5: Examine your work and switch to black in your color picker to paint back sharpness, or switch to another shade to make the blur effect stronger or weaker in any area of your image.


